Why This Recipe Shines
- Flavor balance: Cozy, bright, and layered — never flat.
- Beginner tested: Clear steps with real-life timing cues.
- Customize-friendly: Works with pantry swaps and add-ins.
- Make ahead approved: Holds texture and flavor beautifully.
Ingredient Breakdown
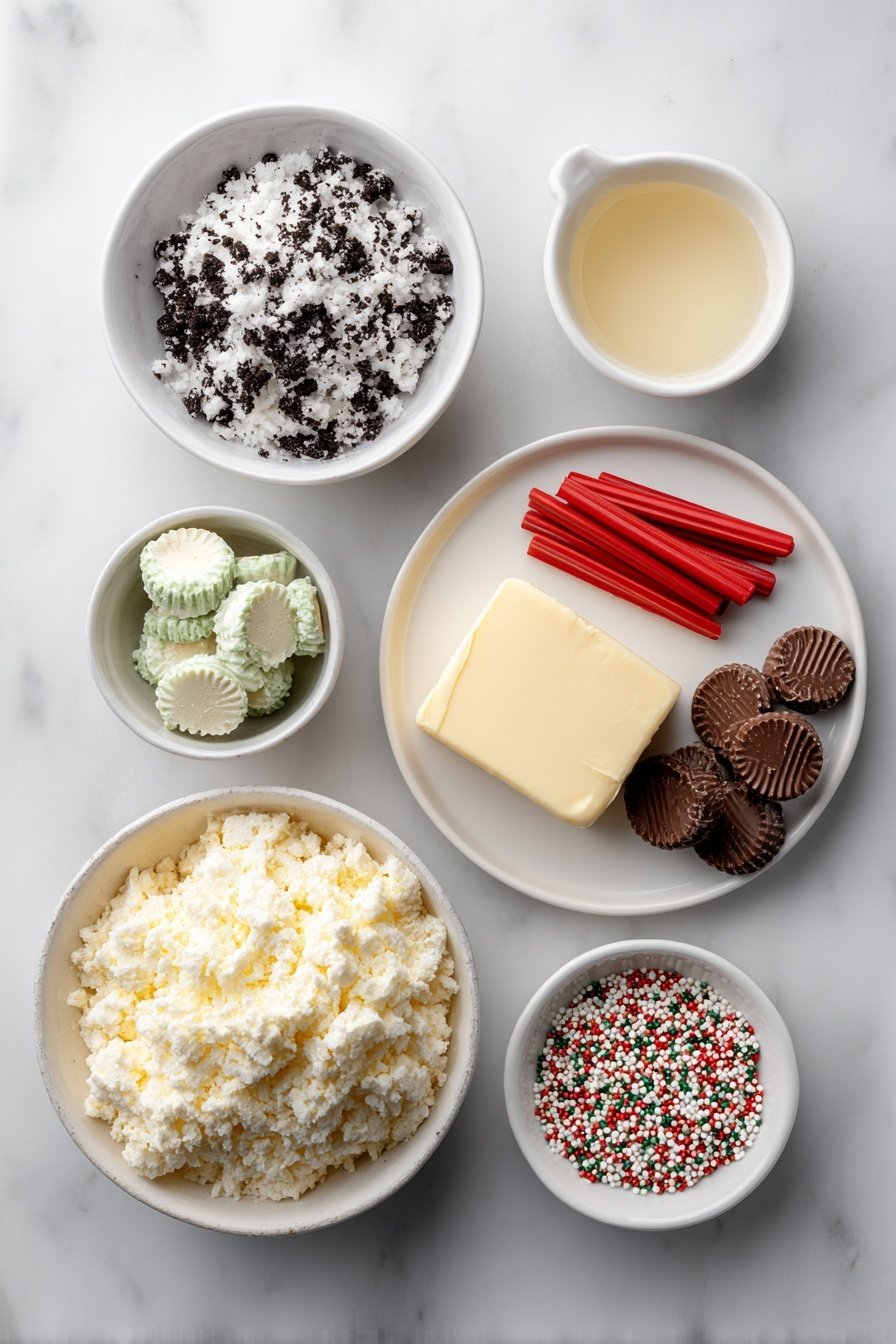
- Oreo cookies (3 cups, finely crushed): The chocolatey backbone; substitute with any chocolate sandwich cookies or gluten-free versions for dietary needs.
- Cream cheese (8 oz, softened): Adds luscious silkiness and binds the mixture; you can try mascarpone for richer flavor or vegan cream cheese to keep it dairy-free.
- Vanilla extract (1 teaspoon): A subtle warm spice that rounds out flavors; almond or peppermint extract work beautifully for festive twists.
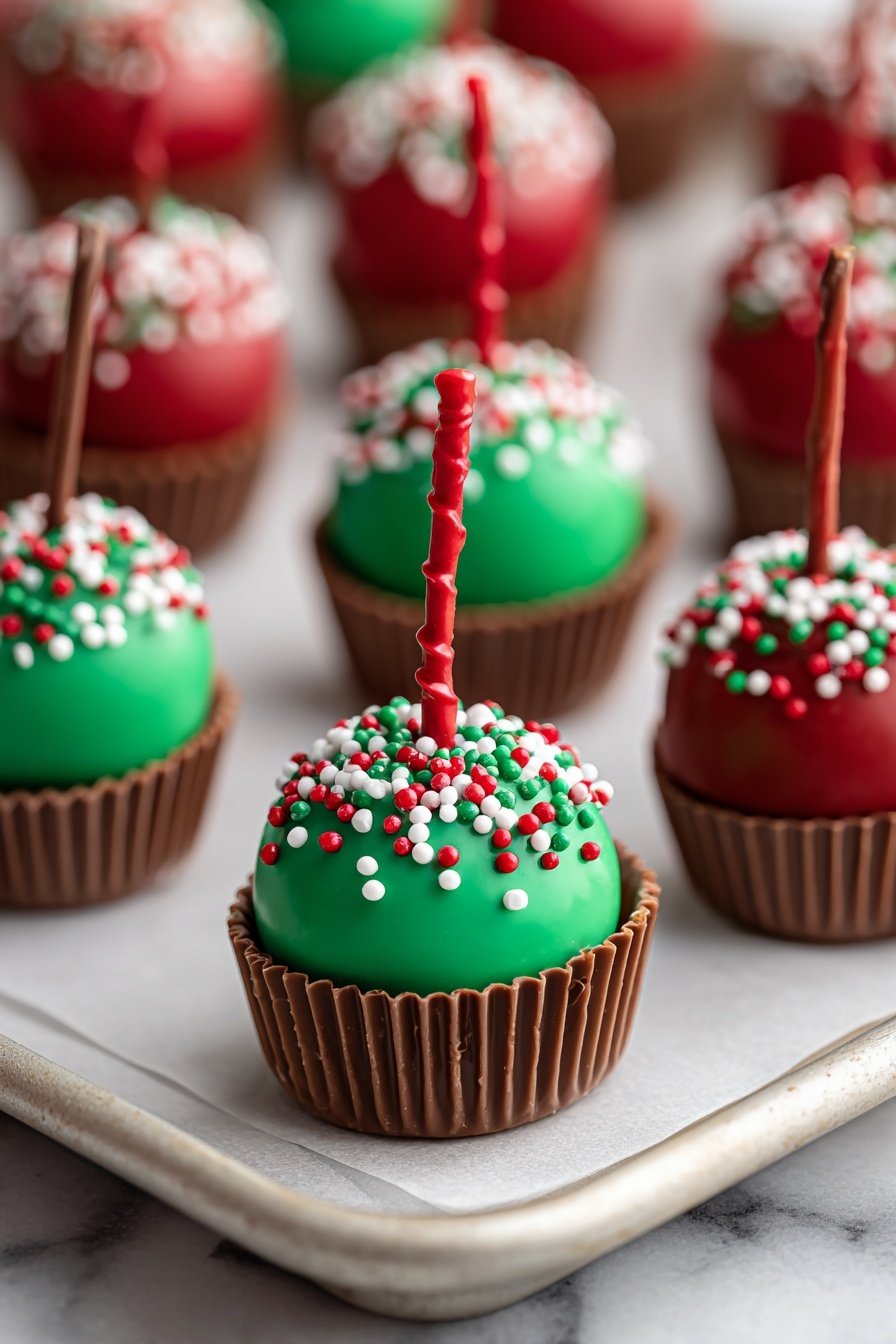
- Green and red melting wafers (1½ cups each): Provide vibrant, glossy coatings; candy melts or colored white chocolate are good alternatives.
- Crisco (2 tablespoons): Helps smooth and shine the coating, making dipping easier and chocolate snappier; swap with coconut oil if you prefer a natural butter aroma.
- Miniature Reese’s Cups (18–20): Fun festive toppers with peanut buttery warmth; use mini chocolate candy or red and green M&Ms for variety.
- Christmas sprinkles: Adds cheerful texture and color; nonpareils or edible glitter are great festive finishes.
- Licorice or red vine candy (2–3 sticks, cut into ½ inch pieces): Mimic ornament hooks wonderfully; candy canes broken into pieces or pretzel sticks also work well.
Before You Begin
Before diving in, make sure you have all your ingredients prepped and ready — this recipe flows best when everything’s within arm’s reach. I recommend softening your cream cheese about 30 minutes prior; it should be pliable but not melted, allowing it to blend perfectly with crushed Oreos. Line your cookie sheets with parchment paper to catch any drips and help the chocolate set cleanly. Since no baking is involved, there’s no oven temperature to worry about — just patience for chilling!What You’ll Need
Essential tools to make Christmas Oreo Truffle Decorations Recipe easy and enjoyable — plus optional upgrades if you love efficiency.
How to Make Christmas Oreo Truffle Decorations Recipe

- Prepare your work surface. Line a large cookie sheet with parchment paper. This will be your resting place for the truffles as they chill and dry. It keeps everything tidy and makes cleanup effortless.
- Mix the truffle dough. In a bowl, combine the finely crushed Oreo cookies with softened cream cheese and vanilla extract. Use a sturdy spoon or a mixer on low speed. You’ll want a smooth, uniform dough with a slightly sticky sheen — that silky texture means they’ll hold together perfectly once chilled.
- Scoop and shape. Using a 1-inch cookie scoop, portion out the dough. Roll each ball gently between your palms until perfectly round and smooth, about 1 to 1½-inches across. This size creates a rich, single-bite explosion of flavor.
- Chill the truffles. Arrange your truffle balls on the parchment-lined cookie sheet, spacing them out so they don’t stick together. Refrigerate for 1 hour to let them firm up nicely — this step makes the dipping stage much easier and prevents messy melting.
- Start melting your first coating color. Approximately 5 to 10 minutes before the truffles finish chilling, place your first color of melting wafers into a heatproof bowl. Set up a double boiler by simmering 3-4 inches of water in a pot and positioning the bowl above without the bottom touching water. Stir the wafers gently as they begin to soften.
- Add Crisco and finish melting. When the wafers are halfway melted but still a bit chunky, stir in 1 tablespoon of Crisco. This addition creates a silky smooth chocolate with a beautiful glossy finish. Continue stirring until fully melted — the chocolate should flow like velvet.
- Dip the truffles. Using two forks or special dipping tools, gently submerge each chilled truffle ball in the melted coating. Roll it around so the entire surface is evenly covered in that shiny layer. Let excess drip off before placing back on the parchment paper.
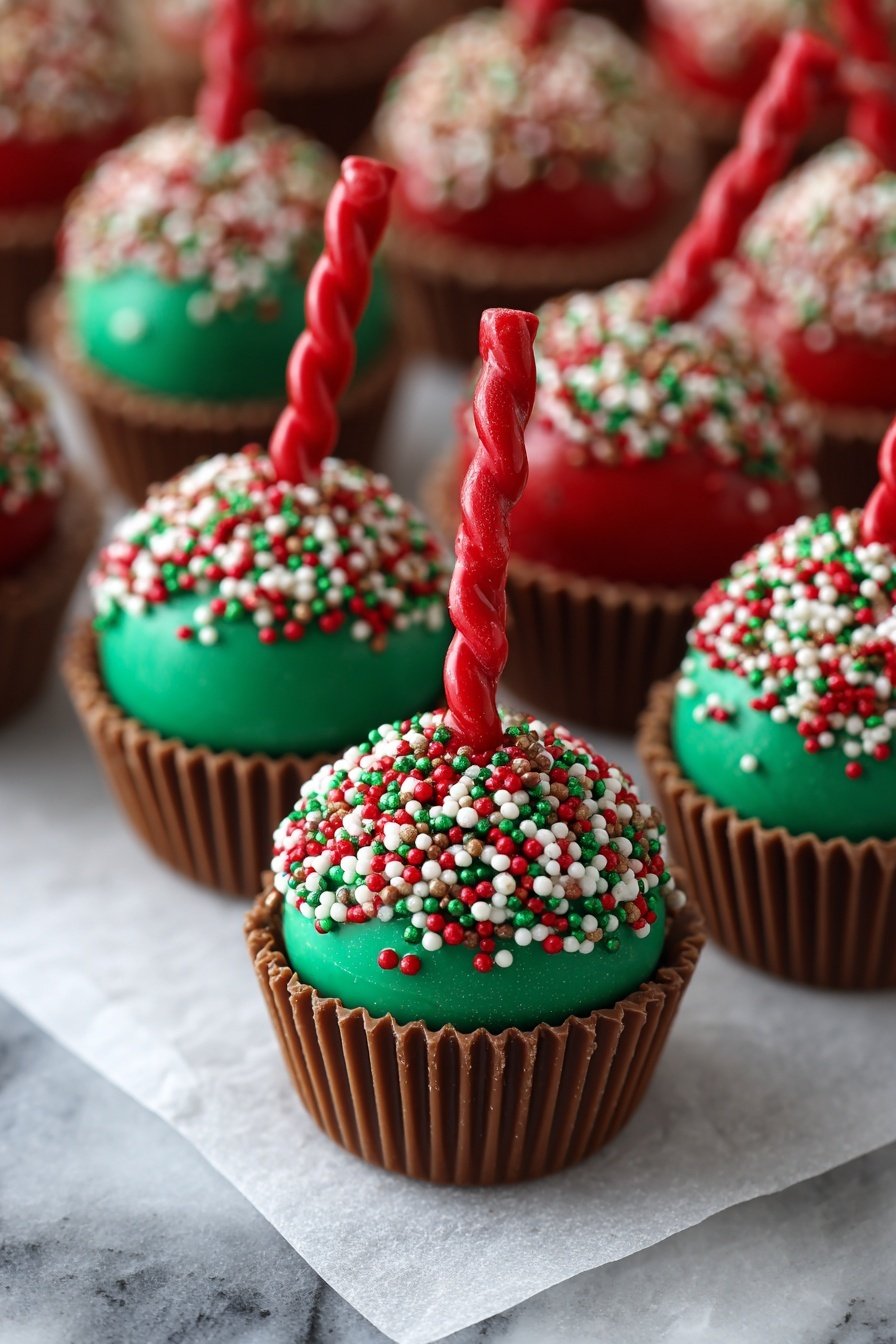
- Decorate your truffles. While the coating is still wet, press an upside-down miniature Reese’s Cup gently on top of each dipped truffle. Then sprinkle with Christmas sprinkles for festive texture and color. Dollop a tiny bit of melted chocolate on the Reese’s Cup, then insert a small piece of licorice or red vine candy vertically to imitate an ornament hook. This small detail adds charm and holiday spirit.
- Chill the first half. Finish decorating half the truffle batch and slide the baking sheet into the refrigerator to set for at least 20 minutes. Firm truffles will make the next steps easier.
- Melt the second color wafers. While the first half chills, repeat the melting process with the other color of wafers—green or red—so everything is ready to go without waiting.
- Dip and decorate the remaining truffles. Just like you did the first half, dip the rest of the truffle balls in the second coating, then decorate with the miniature Reese’s Cups, sprinkles, and licorice candy pieces to keep the festive theme consistent.
- Final chill and set. Return all decorated truffles to the refrigerator for an additional 20 minutes. This step seals your truffles with a crisp, glossy shell and allows flavors to meld before serving or packaging for gifts.
Pro-Level Pointers
If your truffle dough feels too soft to handle, pop it back in the fridge for 15 more minutes — it should be firm but still pliable. When dipping, make sure the melted wafers are warm but not hot, or the truffles can melt and lose shape. Also, stirring in Crisco perfectly smooths the wafers, helping your coating dry with a satisfying snap.
Creative Variations for Christmas Oreo Truffle Decorations Recipe
- Peppermint Twist: Add ½ teaspoon peppermint extract to the truffle dough and garnish with crushed candy canes instead of sprinkles.
- Nutty Surprise: Mix finely chopped toasted pecans or almonds into the dough for added crunch and warmth.
- White Chocolate Wonderland: Use white chocolate melting wafers instead of red or green for a snowy effect, then add silver edible pearls.
- Festive Fruit: Top with dried cranberry bits alongside sprinkles for a tart contrast that balances sweetness.
- Spiced Holiday: Stir in ½ teaspoon cinnamon or pumpkin pie spice to the base mix for a cozy warming note.
- Mini Ornaments Display: Pipe tiny royal icing bows or messages on the Reese’s Cups for personalized edible gift tags.
Storage, Freezing & Reheating
- Storage: Keep truffles refrigerated in an airtight container for up to 1 week. This maintains the creamy texture and crisp coating perfectly.
- Freezing: For longer storage, freeze truffles in a single layer on a parchment-lined tray, then transfer to airtight containers or bags. Freeze for up to 2 months.
- Thawing: To thaw, place frozen truffles in the fridge overnight. Avoid room temperature thawing to prevent condensation softening the chocolate shell.
- Reheating: These truffles are best served cold or at room temperature. If needed, allow them to rest at room temp for 10 minutes before serving to unlock full flavor and silkiness.
Christmas Oreo Truffle Decorations Recipe FAQs
- Can I use regular cream cheese straight from the fridge?
For best results, let your cream cheese soften to room temperature — it blends more smoothly and prevents lumps in the dough. - My melted wafers are clumpy; how can I fix that?
Try stirring in a tablespoon of Crisco or coconut oil halfway through melting. Also, make sure you gently melt over simmering water rather than direct heat. - Can I skip the Reese’s cups or use a different topping?
Absolutely! They add a sweet peanut butter touch but feel free to swap with mini chocolates, nuts, or simply more sprinkles. - How long do these truffles last at room temperature?
Due to the cream cheese content, it’s safest to keep them refrigerated and enjoy within a week. - Is there a way to make these vegan or dairy-free?
Yes! Use dairy-free cream cheese and vegan chocolate or candy melts. Check labels carefully to keep all ingredients plant-based.
Why This Recipe Shines
- Flavor balance: Cozy, bright, and layered — never flat.
- Beginner tested: Clear steps with real-life timing cues.
- Customize-friendly: Works with pantry swaps and add-ins.
- Make ahead approved: Holds texture and flavor beautifully.
Ingredient Breakdown
- Oreo cookies (3 cups, finely crushed): The chocolatey backbone; substitute with any chocolate sandwich cookies or gluten-free versions for dietary needs.
- Cream cheese (8 oz, softened): Adds luscious silkiness and binds the mixture; you can try mascarpone for richer flavor or vegan cream cheese to keep it dairy-free.
- Vanilla extract (1 teaspoon): A subtle warm spice that rounds out flavors; almond or peppermint extract work beautifully for festive twists.
- Green and red melting wafers (1½ cups each): Provide vibrant, glossy coatings; candy melts or colored white chocolate are good alternatives.
- Crisco (2 tablespoons): Helps smooth and shine the coating, making dipping easier and chocolate snappier; swap with coconut oil if you prefer a natural butter aroma.
- Miniature Reese’s Cups (18–20): Fun festive toppers with peanut buttery warmth; use mini chocolate candy or red and green M&Ms for variety.
- Christmas sprinkles: Adds cheerful texture and color; nonpareils or edible glitter are great festive finishes.
- Licorice or red vine candy (2–3 sticks, cut into ½ inch pieces): Mimic ornament hooks wonderfully; candy canes broken into pieces or pretzel sticks also work well.
Before You Begin
Before diving in, make sure you have all your ingredients prepped and ready — this recipe flows best when everything’s within arm’s reach. I recommend softening your cream cheese about 30 minutes prior; it should be pliable but not melted, allowing it to blend perfectly with crushed Oreos. Line your cookie sheets with parchment paper to catch any drips and help the chocolate set cleanly. Since no baking is involved, there’s no oven temperature to worry about — just patience for chilling!What You’ll Need
Essential tools to make Christmas Oreo Truffle Decorations Recipe easy and enjoyable — plus optional upgrades if you love efficiency.
How to Make Christmas Oreo Truffle Decorations Recipe
- Prepare your work surface. Line a large cookie sheet with parchment paper. This will be your resting place for the truffles as they chill and dry. It keeps everything tidy and makes cleanup effortless.
- Mix the truffle dough. In a bowl, combine the finely crushed Oreo cookies with softened cream cheese and vanilla extract. Use a sturdy spoon or a mixer on low speed. You’ll want a smooth, uniform dough with a slightly sticky sheen — that silky texture means they’ll hold together perfectly once chilled.
- Scoop and shape. Using a 1-inch cookie scoop, portion out the dough. Roll each ball gently between your palms until perfectly round and smooth, about 1 to 1½-inches across. This size creates a rich, single-bite explosion of flavor.
- Chill the truffles. Arrange your truffle balls on the parchment-lined cookie sheet, spacing them out so they don’t stick together. Refrigerate for 1 hour to let them firm up nicely — this step makes the dipping stage much easier and prevents messy melting.
- Start melting your first coating color. Approximately 5 to 10 minutes before the truffles finish chilling, place your first color of melting wafers into a heatproof bowl. Set up a double boiler by simmering 3-4 inches of water in a pot and positioning the bowl above without the bottom touching water. Stir the wafers gently as they begin to soften.
- Add Crisco and finish melting. When the wafers are halfway melted but still a bit chunky, stir in 1 tablespoon of Crisco. This addition creates a silky smooth chocolate with a beautiful glossy finish. Continue stirring until fully melted — the chocolate should flow like velvet.
- Dip the truffles. Using two forks or special dipping tools, gently submerge each chilled truffle ball in the melted coating. Roll it around so the entire surface is evenly covered in that shiny layer. Let excess drip off before placing back on the parchment paper.
- Decorate your truffles. While the coating is still wet, press an upside-down miniature Reese’s Cup gently on top of each dipped truffle. Then sprinkle with Christmas sprinkles for festive texture and color. Dollop a tiny bit of melted chocolate on the Reese’s Cup, then insert a small piece of licorice or red vine candy vertically to imitate an ornament hook. This small detail adds charm and holiday spirit.
- Chill the first half. Finish decorating half the truffle batch and slide the baking sheet into the refrigerator to set for at least 20 minutes. Firm truffles will make the next steps easier.
- Melt the second color wafers. While the first half chills, repeat the melting process with the other color of wafers—green or red—so everything is ready to go without waiting.
- Dip and decorate the remaining truffles. Just like you did the first half, dip the rest of the truffle balls in the second coating, then decorate with the miniature Reese’s Cups, sprinkles, and licorice candy pieces to keep the festive theme consistent.
- Final chill and set. Return all decorated truffles to the refrigerator for an additional 20 minutes. This step seals your truffles with a crisp, glossy shell and allows flavors to meld before serving or packaging for gifts.
Pro-Level Pointers
If your truffle dough feels too soft to handle, pop it back in the fridge for 15 more minutes — it should be firm but still pliable. When dipping, make sure the melted wafers are warm but not hot, or the truffles can melt and lose shape. Also, stirring in Crisco perfectly smooths the wafers, helping your coating dry with a satisfying snap.
Creative Variations for Christmas Oreo Truffle Decorations Recipe
- Peppermint Twist: Add ½ teaspoon peppermint extract to the truffle dough and garnish with crushed candy canes instead of sprinkles.
- Nutty Surprise: Mix finely chopped toasted pecans or almonds into the dough for added crunch and warmth.
- White Chocolate Wonderland: Use white chocolate melting wafers instead of red or green for a snowy effect, then add silver edible pearls.
- Festive Fruit: Top with dried cranberry bits alongside sprinkles for a tart contrast that balances sweetness.
- Spiced Holiday: Stir in ½ teaspoon cinnamon or pumpkin pie spice to the base mix for a cozy warming note.
- Mini Ornaments Display: Pipe tiny royal icing bows or messages on the Reese’s Cups for personalized edible gift tags.
Storage, Freezing & Reheating
- Storage: Keep truffles refrigerated in an airtight container for up to 1 week. This maintains the creamy texture and crisp coating perfectly.
- Freezing: For longer storage, freeze truffles in a single layer on a parchment-lined tray, then transfer to airtight containers or bags. Freeze for up to 2 months.
- Thawing: To thaw, place frozen truffles in the fridge overnight. Avoid room temperature thawing to prevent condensation softening the chocolate shell.
- Reheating: These truffles are best served cold or at room temperature. If needed, allow them to rest at room temp for 10 minutes before serving to unlock full flavor and silkiness.
Christmas Oreo Truffle Decorations Recipe FAQs
- Can I use regular cream cheese straight from the fridge?
For best results, let your cream cheese soften to room temperature — it blends more smoothly and prevents lumps in the dough. - My melted wafers are clumpy; how can I fix that?
Try stirring in a tablespoon of Crisco or coconut oil halfway through melting. Also, make sure you gently melt over simmering water rather than direct heat. - Can I skip the Reese’s cups or use a different topping?
Absolutely! They add a sweet peanut butter touch but feel free to swap with mini chocolates, nuts, or simply more sprinkles. - How long do these truffles last at room temperature?
Due to the cream cheese content, it’s safest to keep them refrigerated and enjoy within a week. - Is there a way to make these vegan or dairy-free?
Yes! Use dairy-free cream cheese and vegan chocolate or candy melts. Check labels carefully to keep all ingredients plant-based.
The Heart of Christmas Oreo Truffle Decorations Recipe
There’s something truly special about crafting Christmas treats that feel as festive as they taste. The Christmas Oreo Truffle Decorations Recipe brings together creamy, chocolatey bliss with bright red and green touches that instantly spark joy. I love how it’s such a cozy, hands-on activity — like decorating your own little edible ornaments straight from the heart of your kitchen. As you roll the silky, slightly sticky Oreo and cream cheese mixture into smooth balls, you’ll notice how the texture hints at the luscious bite to come. Then dipping them in glossy, colorful melting wafers feels a bit like magic – watching the chocolate shimmer into a crisp-edged coat. This recipe really lets you blend delicious flavors with a sprinkle of holiday cheer, creating truffles that are perfect for gift-giving or gathering around the table with friends and family. I’m excited to share this step-by-step guide with you, so you’ll feel confident making these charming truffles in your own kitchen. Before we get started, here’s why this Christmas Oreo Truffle Decorations Recipe deserves a spot on your holiday must-make list.Why This Recipe Shines
- Flavor balance: Cozy, bright, and layered — never flat.
- Beginner tested: Clear steps with real-life timing cues.
- Customize-friendly: Works with pantry swaps and add-ins.
- Make ahead approved: Holds texture and flavor beautifully.
Ingredient Breakdown
- Oreo cookies (3 cups, finely crushed): The chocolatey backbone; substitute with any chocolate sandwich cookies or gluten-free versions for dietary needs.
- Cream cheese (8 oz, softened): Adds luscious silkiness and binds the mixture; you can try mascarpone for richer flavor or vegan cream cheese to keep it dairy-free.
- Vanilla extract (1 teaspoon): A subtle warm spice that rounds out flavors; almond or peppermint extract work beautifully for festive twists.
- Green and red melting wafers (1½ cups each): Provide vibrant, glossy coatings; candy melts or colored white chocolate are good alternatives.
- Crisco (2 tablespoons): Helps smooth and shine the coating, making dipping easier and chocolate snappier; swap with coconut oil if you prefer a natural butter aroma.
- Miniature Reese’s Cups (18–20): Fun festive toppers with peanut buttery warmth; use mini chocolate candy or red and green M&Ms for variety.
- Christmas sprinkles: Adds cheerful texture and color; nonpareils or edible glitter are great festive finishes.
- Licorice or red vine candy (2–3 sticks, cut into ½ inch pieces): Mimic ornament hooks wonderfully; candy canes broken into pieces or pretzel sticks also work well.
Before You Begin
Before diving in, make sure you have all your ingredients prepped and ready — this recipe flows best when everything’s within arm’s reach. I recommend softening your cream cheese about 30 minutes prior; it should be pliable but not melted, allowing it to blend perfectly with crushed Oreos. Line your cookie sheets with parchment paper to catch any drips and help the chocolate set cleanly. Since no baking is involved, there’s no oven temperature to worry about — just patience for chilling!What You’ll Need
Essential tools to make Christmas Oreo Truffle Decorations Recipe easy and enjoyable — plus optional upgrades if you love efficiency.
How to Make Christmas Oreo Truffle Decorations Recipe
- Prepare your work surface. Line a large cookie sheet with parchment paper. This will be your resting place for the truffles as they chill and dry. It keeps everything tidy and makes cleanup effortless.
- Mix the truffle dough. In a bowl, combine the finely crushed Oreo cookies with softened cream cheese and vanilla extract. Use a sturdy spoon or a mixer on low speed. You’ll want a smooth, uniform dough with a slightly sticky sheen — that silky texture means they’ll hold together perfectly once chilled.
- Scoop and shape. Using a 1-inch cookie scoop, portion out the dough. Roll each ball gently between your palms until perfectly round and smooth, about 1 to 1½-inches across. This size creates a rich, single-bite explosion of flavor.
- Chill the truffles. Arrange your truffle balls on the parchment-lined cookie sheet, spacing them out so they don’t stick together. Refrigerate for 1 hour to let them firm up nicely — this step makes the dipping stage much easier and prevents messy melting.
- Start melting your first coating color. Approximately 5 to 10 minutes before the truffles finish chilling, place your first color of melting wafers into a heatproof bowl. Set up a double boiler by simmering 3-4 inches of water in a pot and positioning the bowl above without the bottom touching water. Stir the wafers gently as they begin to soften.
- Add Crisco and finish melting. When the wafers are halfway melted but still a bit chunky, stir in 1 tablespoon of Crisco. This addition creates a silky smooth chocolate with a beautiful glossy finish. Continue stirring until fully melted — the chocolate should flow like velvet.
- Dip the truffles. Using two forks or special dipping tools, gently submerge each chilled truffle ball in the melted coating. Roll it around so the entire surface is evenly covered in that shiny layer. Let excess drip off before placing back on the parchment paper.
- Decorate your truffles. While the coating is still wet, press an upside-down miniature Reese’s Cup gently on top of each dipped truffle. Then sprinkle with Christmas sprinkles for festive texture and color. Dollop a tiny bit of melted chocolate on the Reese’s Cup, then insert a small piece of licorice or red vine candy vertically to imitate an ornament hook. This small detail adds charm and holiday spirit.
- Chill the first half. Finish decorating half the truffle batch and slide the baking sheet into the refrigerator to set for at least 20 minutes. Firm truffles will make the next steps easier.
- Melt the second color wafers. While the first half chills, repeat the melting process with the other color of wafers—green or red—so everything is ready to go without waiting.
- Dip and decorate the remaining truffles. Just like you did the first half, dip the rest of the truffle balls in the second coating, then decorate with the miniature Reese’s Cups, sprinkles, and licorice candy pieces to keep the festive theme consistent.
- Final chill and set. Return all decorated truffles to the refrigerator for an additional 20 minutes. This step seals your truffles with a crisp, glossy shell and allows flavors to meld before serving or packaging for gifts.
Pro-Level Pointers
If your truffle dough feels too soft to handle, pop it back in the fridge for 15 more minutes — it should be firm but still pliable. When dipping, make sure the melted wafers are warm but not hot, or the truffles can melt and lose shape. Also, stirring in Crisco perfectly smooths the wafers, helping your coating dry with a satisfying snap.
Creative Variations for Christmas Oreo Truffle Decorations Recipe
- Peppermint Twist: Add ½ teaspoon peppermint extract to the truffle dough and garnish with crushed candy canes instead of sprinkles.
- Nutty Surprise: Mix finely chopped toasted pecans or almonds into the dough for added crunch and warmth.
- White Chocolate Wonderland: Use white chocolate melting wafers instead of red or green for a snowy effect, then add silver edible pearls.
- Festive Fruit: Top with dried cranberry bits alongside sprinkles for a tart contrast that balances sweetness.
- Spiced Holiday: Stir in ½ teaspoon cinnamon or pumpkin pie spice to the base mix for a cozy warming note.
- Mini Ornaments Display: Pipe tiny royal icing bows or messages on the Reese’s Cups for personalized edible gift tags.
Storage, Freezing & Reheating
- Storage: Keep truffles refrigerated in an airtight container for up to 1 week. This maintains the creamy texture and crisp coating perfectly.
- Freezing: For longer storage, freeze truffles in a single layer on a parchment-lined tray, then transfer to airtight containers or bags. Freeze for up to 2 months.
- Thawing: To thaw, place frozen truffles in the fridge overnight. Avoid room temperature thawing to prevent condensation softening the chocolate shell.
- Reheating: These truffles are best served cold or at room temperature. If needed, allow them to rest at room temp for 10 minutes before serving to unlock full flavor and silkiness.
Christmas Oreo Truffle Decorations Recipe FAQs
- Can I use regular cream cheese straight from the fridge?
For best results, let your cream cheese soften to room temperature — it blends more smoothly and prevents lumps in the dough. - My melted wafers are clumpy; how can I fix that?
Try stirring in a tablespoon of Crisco or coconut oil halfway through melting. Also, make sure you gently melt over simmering water rather than direct heat. - Can I skip the Reese’s cups or use a different topping?
Absolutely! They add a sweet peanut butter touch but feel free to swap with mini chocolates, nuts, or simply more sprinkles. - How long do these truffles last at room temperature?
Due to the cream cheese content, it’s safest to keep them refrigerated and enjoy within a week. - Is there a way to make these vegan or dairy-free?
Yes! Use dairy-free cream cheese and vegan chocolate or candy melts. Check labels carefully to keep all ingredients plant-based.
Why This Recipe Shines
- Flavor balance: Cozy, bright, and layered — never flat.
- Beginner tested: Clear steps with real-life timing cues.
- Customize-friendly: Works with pantry swaps and add-ins.
- Make ahead approved: Holds texture and flavor beautifully.
Ingredient Breakdown
- Oreo cookies (3 cups, finely crushed): The chocolatey backbone; substitute with any chocolate sandwich cookies or gluten-free versions for dietary needs.
- Cream cheese (8 oz, softened): Adds luscious silkiness and binds the mixture; you can try mascarpone for richer flavor or vegan cream cheese to keep it dairy-free.
- Vanilla extract (1 teaspoon): A subtle warm spice that rounds out flavors; almond or peppermint extract work beautifully for festive twists.
- Green and red melting wafers (1½ cups each): Provide vibrant, glossy coatings; candy melts or colored white chocolate are good alternatives.
- Crisco (2 tablespoons): Helps smooth and shine the coating, making dipping easier and chocolate snappier; swap with coconut oil if you prefer a natural butter aroma.
- Miniature Reese’s Cups (18–20): Fun festive toppers with peanut buttery warmth; use mini chocolate candy or red and green M&Ms for variety.
- Christmas sprinkles: Adds cheerful texture and color; nonpareils or edible glitter are great festive finishes.
- Licorice or red vine candy (2–3 sticks, cut into ½ inch pieces): Mimic ornament hooks wonderfully; candy canes broken into pieces or pretzel sticks also work well.
Before You Begin
Before diving in, make sure you have all your ingredients prepped and ready — this recipe flows best when everything’s within arm’s reach. I recommend softening your cream cheese about 30 minutes prior; it should be pliable but not melted, allowing it to blend perfectly with crushed Oreos. Line your cookie sheets with parchment paper to catch any drips and help the chocolate set cleanly. Since no baking is involved, there’s no oven temperature to worry about — just patience for chilling!What You’ll Need
Essential tools to make Christmas Oreo Truffle Decorations Recipe easy and enjoyable — plus optional upgrades if you love efficiency.
How to Make Christmas Oreo Truffle Decorations Recipe
- Prepare your work surface. Line a large cookie sheet with parchment paper. This will be your resting place for the truffles as they chill and dry. It keeps everything tidy and makes cleanup effortless.
- Mix the truffle dough. In a bowl, combine the finely crushed Oreo cookies with softened cream cheese and vanilla extract. Use a sturdy spoon or a mixer on low speed. You’ll want a smooth, uniform dough with a slightly sticky sheen — that silky texture means they’ll hold together perfectly once chilled.
- Scoop and shape. Using a 1-inch cookie scoop, portion out the dough. Roll each ball gently between your palms until perfectly round and smooth, about 1 to 1½-inches across. This size creates a rich, single-bite explosion of flavor.
- Chill the truffles. Arrange your truffle balls on the parchment-lined cookie sheet, spacing them out so they don’t stick together. Refrigerate for 1 hour to let them firm up nicely — this step makes the dipping stage much easier and prevents messy melting.
- Start melting your first coating color. Approximately 5 to 10 minutes before the truffles finish chilling, place your first color of melting wafers into a heatproof bowl. Set up a double boiler by simmering 3-4 inches of water in a pot and positioning the bowl above without the bottom touching water. Stir the wafers gently as they begin to soften.
- Add Crisco and finish melting. When the wafers are halfway melted but still a bit chunky, stir in 1 tablespoon of Crisco. This addition creates a silky smooth chocolate with a beautiful glossy finish. Continue stirring until fully melted — the chocolate should flow like velvet.
- Dip the truffles. Using two forks or special dipping tools, gently submerge each chilled truffle ball in the melted coating. Roll it around so the entire surface is evenly covered in that shiny layer. Let excess drip off before placing back on the parchment paper.
- Decorate your truffles. While the coating is still wet, press an upside-down miniature Reese’s Cup gently on top of each dipped truffle. Then sprinkle with Christmas sprinkles for festive texture and color. Dollop a tiny bit of melted chocolate on the Reese’s Cup, then insert a small piece of licorice or red vine candy vertically to imitate an ornament hook. This small detail adds charm and holiday spirit.
- Chill the first half. Finish decorating half the truffle batch and slide the baking sheet into the refrigerator to set for at least 20 minutes. Firm truffles will make the next steps easier.
- Melt the second color wafers. While the first half chills, repeat the melting process with the other color of wafers—green or red—so everything is ready to go without waiting.
- Dip and decorate the remaining truffles. Just like you did the first half, dip the rest of the truffle balls in the second coating, then decorate with the miniature Reese’s Cups, sprinkles, and licorice candy pieces to keep the festive theme consistent.
- Final chill and set. Return all decorated truffles to the refrigerator for an additional 20 minutes. This step seals your truffles with a crisp, glossy shell and allows flavors to meld before serving or packaging for gifts.
Pro-Level Pointers
If your truffle dough feels too soft to handle, pop it back in the fridge for 15 more minutes — it should be firm but still pliable. When dipping, make sure the melted wafers are warm but not hot, or the truffles can melt and lose shape. Also, stirring in Crisco perfectly smooths the wafers, helping your coating dry with a satisfying snap.
Creative Variations for Christmas Oreo Truffle Decorations Recipe
- Peppermint Twist: Add ½ teaspoon peppermint extract to the truffle dough and garnish with crushed candy canes instead of sprinkles.
- Nutty Surprise: Mix finely chopped toasted pecans or almonds into the dough for added crunch and warmth.
- White Chocolate Wonderland: Use white chocolate melting wafers instead of red or green for a snowy effect, then add silver edible pearls.
- Festive Fruit: Top with dried cranberry bits alongside sprinkles for a tart contrast that balances sweetness.
- Spiced Holiday: Stir in ½ teaspoon cinnamon or pumpkin pie spice to the base mix for a cozy warming note.
- Mini Ornaments Display: Pipe tiny royal icing bows or messages on the Reese’s Cups for personalized edible gift tags.
Storage, Freezing & Reheating
- Storage: Keep truffles refrigerated in an airtight container for up to 1 week. This maintains the creamy texture and crisp coating perfectly.
- Freezing: For longer storage, freeze truffles in a single layer on a parchment-lined tray, then transfer to airtight containers or bags. Freeze for up to 2 months.
- Thawing: To thaw, place frozen truffles in the fridge overnight. Avoid room temperature thawing to prevent condensation softening the chocolate shell.
- Reheating: These truffles are best served cold or at room temperature. If needed, allow them to rest at room temp for 10 minutes before serving to unlock full flavor and silkiness.
Christmas Oreo Truffle Decorations Recipe FAQs
- Can I use regular cream cheese straight from the fridge?
For best results, let your cream cheese soften to room temperature — it blends more smoothly and prevents lumps in the dough. - My melted wafers are clumpy; how can I fix that?
Try stirring in a tablespoon of Crisco or coconut oil halfway through melting. Also, make sure you gently melt over simmering water rather than direct heat. - Can I skip the Reese’s cups or use a different topping?
Absolutely! They add a sweet peanut butter touch but feel free to swap with mini chocolates, nuts, or simply more sprinkles. - How long do these truffles last at room temperature?
Due to the cream cheese content, it’s safest to keep them refrigerated and enjoy within a week. - Is there a way to make these vegan or dairy-free?
Yes! Use dairy-free cream cheese and vegan chocolate or candy melts. Check labels carefully to keep all ingredients plant-based.
The Heart of Christmas Oreo Truffle Decorations Recipe
There’s something truly special about crafting Christmas treats that feel as festive as they taste. The Christmas Oreo Truffle Decorations Recipe brings together creamy, chocolatey bliss with bright red and green touches that instantly spark joy. I love how it’s such a cozy, hands-on activity — like decorating your own little edible ornaments straight from the heart of your kitchen. As you roll the silky, slightly sticky Oreo and cream cheese mixture into smooth balls, you’ll notice how the texture hints at the luscious bite to come. Then dipping them in glossy, colorful melting wafers feels a bit like magic – watching the chocolate shimmer into a crisp-edged coat. This recipe really lets you blend delicious flavors with a sprinkle of holiday cheer, creating truffles that are perfect for gift-giving or gathering around the table with friends and family. I’m excited to share this step-by-step guide with you, so you’ll feel confident making these charming truffles in your own kitchen. Before we get started, here’s why this Christmas Oreo Truffle Decorations Recipe deserves a spot on your holiday must-make list.Why This Recipe Shines
- Flavor balance: Cozy, bright, and layered — never flat.
- Beginner tested: Clear steps with real-life timing cues.
- Customize-friendly: Works with pantry swaps and add-ins.
- Make ahead approved: Holds texture and flavor beautifully.
Ingredient Breakdown
- Oreo cookies (3 cups, finely crushed): The chocolatey backbone; substitute with any chocolate sandwich cookies or gluten-free versions for dietary needs.
- Cream cheese (8 oz, softened): Adds luscious silkiness and binds the mixture; you can try mascarpone for richer flavor or vegan cream cheese to keep it dairy-free.
- Vanilla extract (1 teaspoon): A subtle warm spice that rounds out flavors; almond or peppermint extract work beautifully for festive twists.
- Green and red melting wafers (1½ cups each): Provide vibrant, glossy coatings; candy melts or colored white chocolate are good alternatives.
- Crisco (2 tablespoons): Helps smooth and shine the coating, making dipping easier and chocolate snappier; swap with coconut oil if you prefer a natural butter aroma.
- Miniature Reese’s Cups (18–20): Fun festive toppers with peanut buttery warmth; use mini chocolate candy or red and green M&Ms for variety.
- Christmas sprinkles: Adds cheerful texture and color; nonpareils or edible glitter are great festive finishes.
- Licorice or red vine candy (2–3 sticks, cut into ½ inch pieces): Mimic ornament hooks wonderfully; candy canes broken into pieces or pretzel sticks also work well.
Before You Begin
Before diving in, make sure you have all your ingredients prepped and ready — this recipe flows best when everything’s within arm’s reach. I recommend softening your cream cheese about 30 minutes prior; it should be pliable but not melted, allowing it to blend perfectly with crushed Oreos. Line your cookie sheets with parchment paper to catch any drips and help the chocolate set cleanly. Since no baking is involved, there’s no oven temperature to worry about — just patience for chilling!What You’ll Need
Essential tools to make Christmas Oreo Truffle Decorations Recipe easy and enjoyable — plus optional upgrades if you love efficiency.
How to Make Christmas Oreo Truffle Decorations Recipe
- Prepare your work surface. Line a large cookie sheet with parchment paper. This will be your resting place for the truffles as they chill and dry. It keeps everything tidy and makes cleanup effortless.
- Mix the truffle dough. In a bowl, combine the finely crushed Oreo cookies with softened cream cheese and vanilla extract. Use a sturdy spoon or a mixer on low speed. You’ll want a smooth, uniform dough with a slightly sticky sheen — that silky texture means they’ll hold together perfectly once chilled.
- Scoop and shape. Using a 1-inch cookie scoop, portion out the dough. Roll each ball gently between your palms until perfectly round and smooth, about 1 to 1½-inches across. This size creates a rich, single-bite explosion of flavor.
- Chill the truffles. Arrange your truffle balls on the parchment-lined cookie sheet, spacing them out so they don’t stick together. Refrigerate for 1 hour to let them firm up nicely — this step makes the dipping stage much easier and prevents messy melting.
- Start melting your first coating color. Approximately 5 to 10 minutes before the truffles finish chilling, place your first color of melting wafers into a heatproof bowl. Set up a double boiler by simmering 3-4 inches of water in a pot and positioning the bowl above without the bottom touching water. Stir the wafers gently as they begin to soften.
- Add Crisco and finish melting. When the wafers are halfway melted but still a bit chunky, stir in 1 tablespoon of Crisco. This addition creates a silky smooth chocolate with a beautiful glossy finish. Continue stirring until fully melted — the chocolate should flow like velvet.
- Dip the truffles. Using two forks or special dipping tools, gently submerge each chilled truffle ball in the melted coating. Roll it around so the entire surface is evenly covered in that shiny layer. Let excess drip off before placing back on the parchment paper.
- Decorate your truffles. While the coating is still wet, press an upside-down miniature Reese’s Cup gently on top of each dipped truffle. Then sprinkle with Christmas sprinkles for festive texture and color. Dollop a tiny bit of melted chocolate on the Reese’s Cup, then insert a small piece of licorice or red vine candy vertically to imitate an ornament hook. This small detail adds charm and holiday spirit.
- Chill the first half. Finish decorating half the truffle batch and slide the baking sheet into the refrigerator to set for at least 20 minutes. Firm truffles will make the next steps easier.
- Melt the second color wafers. While the first half chills, repeat the melting process with the other color of wafers—green or red—so everything is ready to go without waiting.
- Dip and decorate the remaining truffles. Just like you did the first half, dip the rest of the truffle balls in the second coating, then decorate with the miniature Reese’s Cups, sprinkles, and licorice candy pieces to keep the festive theme consistent.
- Final chill and set. Return all decorated truffles to the refrigerator for an additional 20 minutes. This step seals your truffles with a crisp, glossy shell and allows flavors to meld before serving or packaging for gifts.
Pro-Level Pointers
If your truffle dough feels too soft to handle, pop it back in the fridge for 15 more minutes — it should be firm but still pliable. When dipping, make sure the melted wafers are warm but not hot, or the truffles can melt and lose shape. Also, stirring in Crisco perfectly smooths the wafers, helping your coating dry with a satisfying snap.
Creative Variations for Christmas Oreo Truffle Decorations Recipe
- Peppermint Twist: Add ½ teaspoon peppermint extract to the truffle dough and garnish with crushed candy canes instead of sprinkles.
- Nutty Surprise: Mix finely chopped toasted pecans or almonds into the dough for added crunch and warmth.
- White Chocolate Wonderland: Use white chocolate melting wafers instead of red or green for a snowy effect, then add silver edible pearls.
- Festive Fruit: Top with dried cranberry bits alongside sprinkles for a tart contrast that balances sweetness.
- Spiced Holiday: Stir in ½ teaspoon cinnamon or pumpkin pie spice to the base mix for a cozy warming note.
- Mini Ornaments Display: Pipe tiny royal icing bows or messages on the Reese’s Cups for personalized edible gift tags.
Storage, Freezing & Reheating
- Storage: Keep truffles refrigerated in an airtight container for up to 1 week. This maintains the creamy texture and crisp coating perfectly.
- Freezing: For longer storage, freeze truffles in a single layer on a parchment-lined tray, then transfer to airtight containers or bags. Freeze for up to 2 months.
- Thawing: To thaw, place frozen truffles in the fridge overnight. Avoid room temperature thawing to prevent condensation softening the chocolate shell.
- Reheating: These truffles are best served cold or at room temperature. If needed, allow them to rest at room temp for 10 minutes before serving to unlock full flavor and silkiness.
Christmas Oreo Truffle Decorations Recipe FAQs
- Can I use regular cream cheese straight from the fridge?
For best results, let your cream cheese soften to room temperature — it blends more smoothly and prevents lumps in the dough. - My melted wafers are clumpy; how can I fix that?
Try stirring in a tablespoon of Crisco or coconut oil halfway through melting. Also, make sure you gently melt over simmering water rather than direct heat. - Can I skip the Reese’s cups or use a different topping?
Absolutely! They add a sweet peanut butter touch but feel free to swap with mini chocolates, nuts, or simply more sprinkles. - How long do these truffles last at room temperature?
Due to the cream cheese content, it’s safest to keep them refrigerated and enjoy within a week. - Is there a way to make these vegan or dairy-free?
Yes! Use dairy-free cream cheese and vegan chocolate or candy melts. Check labels carefully to keep all ingredients plant-based.
Why This Recipe Shines
- Flavor balance: Cozy, bright, and layered — never flat.
- Beginner tested: Clear steps with real-life timing cues.
- Customize-friendly: Works with pantry swaps and add-ins.
- Make ahead approved: Holds texture and flavor beautifully.
Ingredient Breakdown
- Oreo cookies (3 cups, finely crushed): The chocolatey backbone; substitute with any chocolate sandwich cookies or gluten-free versions for dietary needs.
- Cream cheese (8 oz, softened): Adds luscious silkiness and binds the mixture; you can try mascarpone for richer flavor or vegan cream cheese to keep it dairy-free.
- Vanilla extract (1 teaspoon): A subtle warm spice that rounds out flavors; almond or peppermint extract work beautifully for festive twists.
- Green and red melting wafers (1½ cups each): Provide vibrant, glossy coatings; candy melts or colored white chocolate are good alternatives.
- Crisco (2 tablespoons): Helps smooth and shine the coating, making dipping easier and chocolate snappier; swap with coconut oil if you prefer a natural butter aroma.
- Miniature Reese’s Cups (18–20): Fun festive toppers with peanut buttery warmth; use mini chocolate candy or red and green M&Ms for variety.
- Christmas sprinkles: Adds cheerful texture and color; nonpareils or edible glitter are great festive finishes.
- Licorice or red vine candy (2–3 sticks, cut into ½ inch pieces): Mimic ornament hooks wonderfully; candy canes broken into pieces or pretzel sticks also work well.
Before You Begin
Before diving in, make sure you have all your ingredients prepped and ready — this recipe flows best when everything’s within arm’s reach. I recommend softening your cream cheese about 30 minutes prior; it should be pliable but not melted, allowing it to blend perfectly with crushed Oreos. Line your cookie sheets with parchment paper to catch any drips and help the chocolate set cleanly. Since no baking is involved, there’s no oven temperature to worry about — just patience for chilling!What You’ll Need
Essential tools to make Christmas Oreo Truffle Decorations Recipe easy and enjoyable — plus optional upgrades if you love efficiency.
How to Make Christmas Oreo Truffle Decorations Recipe
- Prepare your work surface. Line a large cookie sheet with parchment paper. This will be your resting place for the truffles as they chill and dry. It keeps everything tidy and makes cleanup effortless.
- Mix the truffle dough. In a bowl, combine the finely crushed Oreo cookies with softened cream cheese and vanilla extract. Use a sturdy spoon or a mixer on low speed. You’ll want a smooth, uniform dough with a slightly sticky sheen — that silky texture means they’ll hold together perfectly once chilled.
- Scoop and shape. Using a 1-inch cookie scoop, portion out the dough. Roll each ball gently between your palms until perfectly round and smooth, about 1 to 1½-inches across. This size creates a rich, single-bite explosion of flavor.
- Chill the truffles. Arrange your truffle balls on the parchment-lined cookie sheet, spacing them out so they don’t stick together. Refrigerate for 1 hour to let them firm up nicely — this step makes the dipping stage much easier and prevents messy melting.
- Start melting your first coating color. Approximately 5 to 10 minutes before the truffles finish chilling, place your first color of melting wafers into a heatproof bowl. Set up a double boiler by simmering 3-4 inches of water in a pot and positioning the bowl above without the bottom touching water. Stir the wafers gently as they begin to soften.
- Add Crisco and finish melting. When the wafers are halfway melted but still a bit chunky, stir in 1 tablespoon of Crisco. This addition creates a silky smooth chocolate with a beautiful glossy finish. Continue stirring until fully melted — the chocolate should flow like velvet.
- Dip the truffles. Using two forks or special dipping tools, gently submerge each chilled truffle ball in the melted coating. Roll it around so the entire surface is evenly covered in that shiny layer. Let excess drip off before placing back on the parchment paper.
- Decorate your truffles. While the coating is still wet, press an upside-down miniature Reese’s Cup gently on top of each dipped truffle. Then sprinkle with Christmas sprinkles for festive texture and color. Dollop a tiny bit of melted chocolate on the Reese’s Cup, then insert a small piece of licorice or red vine candy vertically to imitate an ornament hook. This small detail adds charm and holiday spirit.
- Chill the first half. Finish decorating half the truffle batch and slide the baking sheet into the refrigerator to set for at least 20 minutes. Firm truffles will make the next steps easier.
- Melt the second color wafers. While the first half chills, repeat the melting process with the other color of wafers—green or red—so everything is ready to go without waiting.
- Dip and decorate the remaining truffles. Just like you did the first half, dip the rest of the truffle balls in the second coating, then decorate with the miniature Reese’s Cups, sprinkles, and licorice candy pieces to keep the festive theme consistent.
- Final chill and set. Return all decorated truffles to the refrigerator for an additional 20 minutes. This step seals your truffles with a crisp, glossy shell and allows flavors to meld before serving or packaging for gifts.
Pro-Level Pointers
If your truffle dough feels too soft to handle, pop it back in the fridge for 15 more minutes — it should be firm but still pliable. When dipping, make sure the melted wafers are warm but not hot, or the truffles can melt and lose shape. Also, stirring in Crisco perfectly smooths the wafers, helping your coating dry with a satisfying snap.
Creative Variations for Christmas Oreo Truffle Decorations Recipe
- Peppermint Twist: Add ½ teaspoon peppermint extract to the truffle dough and garnish with crushed candy canes instead of sprinkles.
- Nutty Surprise: Mix finely chopped toasted pecans or almonds into the dough for added crunch and warmth.
- White Chocolate Wonderland: Use white chocolate melting wafers instead of red or green for a snowy effect, then add silver edible pearls.
- Festive Fruit: Top with dried cranberry bits alongside sprinkles for a tart contrast that balances sweetness.
- Spiced Holiday: Stir in ½ teaspoon cinnamon or pumpkin pie spice to the base mix for a cozy warming note.
- Mini Ornaments Display: Pipe tiny royal icing bows or messages on the Reese’s Cups for personalized edible gift tags.
Storage, Freezing & Reheating
- Storage: Keep truffles refrigerated in an airtight container for up to 1 week. This maintains the creamy texture and crisp coating perfectly.
- Freezing: For longer storage, freeze truffles in a single layer on a parchment-lined tray, then transfer to airtight containers or bags. Freeze for up to 2 months.
- Thawing: To thaw, place frozen truffles in the fridge overnight. Avoid room temperature thawing to prevent condensation softening the chocolate shell.
- Reheating: These truffles are best served cold or at room temperature. If needed, allow them to rest at room temp for 10 minutes before serving to unlock full flavor and silkiness.
Christmas Oreo Truffle Decorations Recipe FAQs
- Can I use regular cream cheese straight from the fridge?
For best results, let your cream cheese soften to room temperature — it blends more smoothly and prevents lumps in the dough. - My melted wafers are clumpy; how can I fix that?
Try stirring in a tablespoon of Crisco or coconut oil halfway through melting. Also, make sure you gently melt over simmering water rather than direct heat. - Can I skip the Reese’s cups or use a different topping?
Absolutely! They add a sweet peanut butter touch but feel free to swap with mini chocolates, nuts, or simply more sprinkles. - How long do these truffles last at room temperature?
Due to the cream cheese content, it’s safest to keep them refrigerated and enjoy within a week. - Is there a way to make these vegan or dairy-free?
Yes! Use dairy-free cream cheese and vegan chocolate or candy melts. Check labels carefully to keep all ingredients plant-based.
The Heart of Christmas Oreo Truffle Decorations Recipe
There’s something truly special about crafting Christmas treats that feel as festive as they taste. The Christmas Oreo Truffle Decorations Recipe brings together creamy, chocolatey bliss with bright red and green touches that instantly spark joy. I love how it’s such a cozy, hands-on activity — like decorating your own little edible ornaments straight from the heart of your kitchen. As you roll the silky, slightly sticky Oreo and cream cheese mixture into smooth balls, you’ll notice how the texture hints at the luscious bite to come. Then dipping them in glossy, colorful melting wafers feels a bit like magic – watching the chocolate shimmer into a crisp-edged coat. This recipe really lets you blend delicious flavors with a sprinkle of holiday cheer, creating truffles that are perfect for gift-giving or gathering around the table with friends and family. I’m excited to share this step-by-step guide with you, so you’ll feel confident making these charming truffles in your own kitchen. Before we get started, here’s why this Christmas Oreo Truffle Decorations Recipe deserves a spot on your holiday must-make list.Why This Recipe Shines
- Flavor balance: Cozy, bright, and layered — never flat.
- Beginner tested: Clear steps with real-life timing cues.
- Customize-friendly: Works with pantry swaps and add-ins.
- Make ahead approved: Holds texture and flavor beautifully.
Ingredient Breakdown
- Oreo cookies (3 cups, finely crushed): The chocolatey backbone; substitute with any chocolate sandwich cookies or gluten-free versions for dietary needs.
- Cream cheese (8 oz, softened): Adds luscious silkiness and binds the mixture; you can try mascarpone for richer flavor or vegan cream cheese to keep it dairy-free.
- Vanilla extract (1 teaspoon): A subtle warm spice that rounds out flavors; almond or peppermint extract work beautifully for festive twists.
- Green and red melting wafers (1½ cups each): Provide vibrant, glossy coatings; candy melts or colored white chocolate are good alternatives.
- Crisco (2 tablespoons): Helps smooth and shine the coating, making dipping easier and chocolate snappier; swap with coconut oil if you prefer a natural butter aroma.
- Miniature Reese’s Cups (18–20): Fun festive toppers with peanut buttery warmth; use mini chocolate candy or red and green M&Ms for variety.
- Christmas sprinkles: Adds cheerful texture and color; nonpareils or edible glitter are great festive finishes.
- Licorice or red vine candy (2–3 sticks, cut into ½ inch pieces): Mimic ornament hooks wonderfully; candy canes broken into pieces or pretzel sticks also work well.
Before You Begin
Before diving in, make sure you have all your ingredients prepped and ready — this recipe flows best when everything’s within arm’s reach. I recommend softening your cream cheese about 30 minutes prior; it should be pliable but not melted, allowing it to blend perfectly with crushed Oreos. Line your cookie sheets with parchment paper to catch any drips and help the chocolate set cleanly. Since no baking is involved, there’s no oven temperature to worry about — just patience for chilling!What You’ll Need
Essential tools to make Christmas Oreo Truffle Decorations Recipe easy and enjoyable — plus optional upgrades if you love efficiency.
How to Make Christmas Oreo Truffle Decorations Recipe
- Prepare your work surface. Line a large cookie sheet with parchment paper. This will be your resting place for the truffles as they chill and dry. It keeps everything tidy and makes cleanup effortless.
- Mix the truffle dough. In a bowl, combine the finely crushed Oreo cookies with softened cream cheese and vanilla extract. Use a sturdy spoon or a mixer on low speed. You’ll want a smooth, uniform dough with a slightly sticky sheen — that silky texture means they’ll hold together perfectly once chilled.
- Scoop and shape. Using a 1-inch cookie scoop, portion out the dough. Roll each ball gently between your palms until perfectly round and smooth, about 1 to 1½-inches across. This size creates a rich, single-bite explosion of flavor.
- Chill the truffles. Arrange your truffle balls on the parchment-lined cookie sheet, spacing them out so they don’t stick together. Refrigerate for 1 hour to let them firm up nicely — this step makes the dipping stage much easier and prevents messy melting.
- Start melting your first coating color. Approximately 5 to 10 minutes before the truffles finish chilling, place your first color of melting wafers into a heatproof bowl. Set up a double boiler by simmering 3-4 inches of water in a pot and positioning the bowl above without the bottom touching water. Stir the wafers gently as they begin to soften.
- Add Crisco and finish melting. When the wafers are halfway melted but still a bit chunky, stir in 1 tablespoon of Crisco. This addition creates a silky smooth chocolate with a beautiful glossy finish. Continue stirring until fully melted — the chocolate should flow like velvet.
- Dip the truffles. Using two forks or special dipping tools, gently submerge each chilled truffle ball in the melted coating. Roll it around so the entire surface is evenly covered in that shiny layer. Let excess drip off before placing back on the parchment paper.
- Decorate your truffles. While the coating is still wet, press an upside-down miniature Reese’s Cup gently on top of each dipped truffle. Then sprinkle with Christmas sprinkles for festive texture and color. Dollop a tiny bit of melted chocolate on the Reese’s Cup, then insert a small piece of licorice or red vine candy vertically to imitate an ornament hook. This small detail adds charm and holiday spirit.
- Chill the first half. Finish decorating half the truffle batch and slide the baking sheet into the refrigerator to set for at least 20 minutes. Firm truffles will make the next steps easier.
- Melt the second color wafers. While the first half chills, repeat the melting process with the other color of wafers—green or red—so everything is ready to go without waiting.
- Dip and decorate the remaining truffles. Just like you did the first half, dip the rest of the truffle balls in the second coating, then decorate with the miniature Reese’s Cups, sprinkles, and licorice candy pieces to keep the festive theme consistent.
- Final chill and set. Return all decorated truffles to the refrigerator for an additional 20 minutes. This step seals your truffles with a crisp, glossy shell and allows flavors to meld before serving or packaging for gifts.
Pro-Level Pointers
If your truffle dough feels too soft to handle, pop it back in the fridge for 15 more minutes — it should be firm but still pliable. When dipping, make sure the melted wafers are warm but not hot, or the truffles can melt and lose shape. Also, stirring in Crisco perfectly smooths the wafers, helping your coating dry with a satisfying snap.
Creative Variations for Christmas Oreo Truffle Decorations Recipe
- Peppermint Twist: Add ½ teaspoon peppermint extract to the truffle dough and garnish with crushed candy canes instead of sprinkles.
- Nutty Surprise: Mix finely chopped toasted pecans or almonds into the dough for added crunch and warmth.
- White Chocolate Wonderland: Use white chocolate melting wafers instead of red or green for a snowy effect, then add silver edible pearls.
- Festive Fruit: Top with dried cranberry bits alongside sprinkles for a tart contrast that balances sweetness.
- Spiced Holiday: Stir in ½ teaspoon cinnamon or pumpkin pie spice to the base mix for a cozy warming note.
- Mini Ornaments Display: Pipe tiny royal icing bows or messages on the Reese’s Cups for personalized edible gift tags.
Storage, Freezing & Reheating
- Storage: Keep truffles refrigerated in an airtight container for up to 1 week. This maintains the creamy texture and crisp coating perfectly.
- Freezing: For longer storage, freeze truffles in a single layer on a parchment-lined tray, then transfer to airtight containers or bags. Freeze for up to 2 months.
- Thawing: To thaw, place frozen truffles in the fridge overnight. Avoid room temperature thawing to prevent condensation softening the chocolate shell.
- Reheating: These truffles are best served cold or at room temperature. If needed, allow them to rest at room temp for 10 minutes before serving to unlock full flavor and silkiness.
Christmas Oreo Truffle Decorations Recipe FAQs
- Can I use regular cream cheese straight from the fridge?
For best results, let your cream cheese soften to room temperature — it blends more smoothly and prevents lumps in the dough. - My melted wafers are clumpy; how can I fix that?
Try stirring in a tablespoon of Crisco or coconut oil halfway through melting. Also, make sure you gently melt over simmering water rather than direct heat. - Can I skip the Reese’s cups or use a different topping?
Absolutely! They add a sweet peanut butter touch but feel free to swap with mini chocolates, nuts, or simply more sprinkles. - How long do these truffles last at room temperature?
Due to the cream cheese content, it’s safest to keep them refrigerated and enjoy within a week. - Is there a way to make these vegan or dairy-free?
Yes! Use dairy-free cream cheese and vegan chocolate or candy melts. Check labels carefully to keep all ingredients plant-based.
Why This Recipe Shines
- Flavor balance: Cozy, bright, and layered — never flat.
- Beginner tested: Clear steps with real-life timing cues.
- Customize-friendly: Works with pantry swaps and add-ins.
- Make ahead approved: Holds texture and flavor beautifully.
Ingredient Breakdown
- Oreo cookies (3 cups, finely crushed): The chocolatey backbone; substitute with any chocolate sandwich cookies or gluten-free versions for dietary needs.
- Cream cheese (8 oz, softened): Adds luscious silkiness and binds the mixture; you can try mascarpone for richer flavor or vegan cream cheese to keep it dairy-free.
- Vanilla extract (1 teaspoon): A subtle warm spice that rounds out flavors; almond or peppermint extract work beautifully for festive twists.
- Green and red melting wafers (1½ cups each): Provide vibrant, glossy coatings; candy melts or colored white chocolate are good alternatives.
- Crisco (2 tablespoons): Helps smooth and shine the coating, making dipping easier and chocolate snappier; swap with coconut oil if you prefer a natural butter aroma.
- Miniature Reese’s Cups (18–20): Fun festive toppers with peanut buttery warmth; use mini chocolate candy or red and green M&Ms for variety.
- Christmas sprinkles: Adds cheerful texture and color; nonpareils or edible glitter are great festive finishes.
- Licorice or red vine candy (2–3 sticks, cut into ½ inch pieces): Mimic ornament hooks wonderfully; candy canes broken into pieces or pretzel sticks also work well.
Before You Begin
Before diving in, make sure you have all your ingredients prepped and ready — this recipe flows best when everything’s within arm’s reach. I recommend softening your cream cheese about 30 minutes prior; it should be pliable but not melted, allowing it to blend perfectly with crushed Oreos. Line your cookie sheets with parchment paper to catch any drips and help the chocolate set cleanly. Since no baking is involved, there’s no oven temperature to worry about — just patience for chilling!What You’ll Need
Essential tools to make Christmas Oreo Truffle Decorations Recipe easy and enjoyable — plus optional upgrades if you love efficiency.
How to Make Christmas Oreo Truffle Decorations Recipe
- Prepare your work surface. Line a large cookie sheet with parchment paper. This will be your resting place for the truffles as they chill and dry. It keeps everything tidy and makes cleanup effortless.
- Mix the truffle dough. In a bowl, combine the finely crushed Oreo cookies with softened cream cheese and vanilla extract. Use a sturdy spoon or a mixer on low speed. You’ll want a smooth, uniform dough with a slightly sticky sheen — that silky texture means they’ll hold together perfectly once chilled.
- Scoop and shape. Using a 1-inch cookie scoop, portion out the dough. Roll each ball gently between your palms until perfectly round and smooth, about 1 to 1½-inches across. This size creates a rich, single-bite explosion of flavor.
- Chill the truffles. Arrange your truffle balls on the parchment-lined cookie sheet, spacing them out so they don’t stick together. Refrigerate for 1 hour to let them firm up nicely — this step makes the dipping stage much easier and prevents messy melting.
- Start melting your first coating color. Approximately 5 to 10 minutes before the truffles finish chilling, place your first color of melting wafers into a heatproof bowl. Set up a double boiler by simmering 3-4 inches of water in a pot and positioning the bowl above without the bottom touching water. Stir the wafers gently as they begin to soften.
- Add Crisco and finish melting. When the wafers are halfway melted but still a bit chunky, stir in 1 tablespoon of Crisco. This addition creates a silky smooth chocolate with a beautiful glossy finish. Continue stirring until fully melted — the chocolate should flow like velvet.
- Dip the truffles. Using two forks or special dipping tools, gently submerge each chilled truffle ball in the melted coating. Roll it around so the entire surface is evenly covered in that shiny layer. Let excess drip off before placing back on the parchment paper.
- Decorate your truffles. While the coating is still wet, press an upside-down miniature Reese’s Cup gently on top of each dipped truffle. Then sprinkle with Christmas sprinkles for festive texture and color. Dollop a tiny bit of melted chocolate on the Reese’s Cup, then insert a small piece of licorice or red vine candy vertically to imitate an ornament hook. This small detail adds charm and holiday spirit.
- Chill the first half. Finish decorating half the truffle batch and slide the baking sheet into the refrigerator to set for at least 20 minutes. Firm truffles will make the next steps easier.
- Melt the second color wafers. While the first half chills, repeat the melting process with the other color of wafers—green or red—so everything is ready to go without waiting.
- Dip and decorate the remaining truffles. Just like you did the first half, dip the rest of the truffle balls in the second coating, then decorate with the miniature Reese’s Cups, sprinkles, and licorice candy pieces to keep the festive theme consistent.
- Final chill and set. Return all decorated truffles to the refrigerator for an additional 20 minutes. This step seals your truffles with a crisp, glossy shell and allows flavors to meld before serving or packaging for gifts.
Pro-Level Pointers
If your truffle dough feels too soft to handle, pop it back in the fridge for 15 more minutes — it should be firm but still pliable. When dipping, make sure the melted wafers are warm but not hot, or the truffles can melt and lose shape. Also, stirring in Crisco perfectly smooths the wafers, helping your coating dry with a satisfying snap.
Creative Variations for Christmas Oreo Truffle Decorations Recipe
- Peppermint Twist: Add ½ teaspoon peppermint extract to the truffle dough and garnish with crushed candy canes instead of sprinkles.
- Nutty Surprise: Mix finely chopped toasted pecans or almonds into the dough for added crunch and warmth.
- White Chocolate Wonderland: Use white chocolate melting wafers instead of red or green for a snowy effect, then add silver edible pearls.
- Festive Fruit: Top with dried cranberry bits alongside sprinkles for a tart contrast that balances sweetness.
- Spiced Holiday: Stir in ½ teaspoon cinnamon or pumpkin pie spice to the base mix for a cozy warming note.
- Mini Ornaments Display: Pipe tiny royal icing bows or messages on the Reese’s Cups for personalized edible gift tags.
Storage, Freezing & Reheating
- Storage: Keep truffles refrigerated in an airtight container for up to 1 week. This maintains the creamy texture and crisp coating perfectly.
- Freezing: For longer storage, freeze truffles in a single layer on a parchment-lined tray, then transfer to airtight containers or bags. Freeze for up to 2 months.
- Thawing: To thaw, place frozen truffles in the fridge overnight. Avoid room temperature thawing to prevent condensation softening the chocolate shell.
- Reheating: These truffles are best served cold or at room temperature. If needed, allow them to rest at room temp for 10 minutes before serving to unlock full flavor and silkiness.
Christmas Oreo Truffle Decorations Recipe FAQs
- Can I use regular cream cheese straight from the fridge?
For best results, let your cream cheese soften to room temperature — it blends more smoothly and prevents lumps in the dough. - My melted wafers are clumpy; how can I fix that?
Try stirring in a tablespoon of Crisco or coconut oil halfway through melting. Also, make sure you gently melt over simmering water rather than direct heat. - Can I skip the Reese’s cups or use a different topping?
Absolutely! They add a sweet peanut butter touch but feel free to swap with mini chocolates, nuts, or simply more sprinkles. - How long do these truffles last at room temperature?
Due to the cream cheese content, it’s safest to keep them refrigerated and enjoy within a week. - Is there a way to make these vegan or dairy-free?
Yes! Use dairy-free cream cheese and vegan chocolate or candy melts. Check labels carefully to keep all ingredients plant-based.
The Heart of Christmas Oreo Truffle Decorations Recipe
There’s something truly special about crafting Christmas treats that feel as festive as they taste. The Christmas Oreo Truffle Decorations Recipe brings together creamy, chocolatey bliss with bright red and green touches that instantly spark joy. I love how it’s such a cozy, hands-on activity — like decorating your own little edible ornaments straight from the heart of your kitchen. As you roll the silky, slightly sticky Oreo and cream cheese mixture into smooth balls, you’ll notice how the texture hints at the luscious bite to come. Then dipping them in glossy, colorful melting wafers feels a bit like magic – watching the chocolate shimmer into a crisp-edged coat. This recipe really lets you blend delicious flavors with a sprinkle of holiday cheer, creating truffles that are perfect for gift-giving or gathering around the table with friends and family. I’m excited to share this step-by-step guide with you, so you’ll feel confident making these charming truffles in your own kitchen. Before we get started, here’s why this Christmas Oreo Truffle Decorations Recipe deserves a spot on your holiday must-make list.Why This Recipe Shines
- Flavor balance: Cozy, bright, and layered — never flat.
- Beginner tested: Clear steps with real-life timing cues.
- Customize-friendly: Works with pantry swaps and add-ins.
- Make ahead approved: Holds texture and flavor beautifully.
Ingredient Breakdown
- Oreo cookies (3 cups, finely crushed): The chocolatey backbone; substitute with any chocolate sandwich cookies or gluten-free versions for dietary needs.
- Cream cheese (8 oz, softened): Adds luscious silkiness and binds the mixture; you can try mascarpone for richer flavor or vegan cream cheese to keep it dairy-free.
- Vanilla extract (1 teaspoon): A subtle warm spice that rounds out flavors; almond or peppermint extract work beautifully for festive twists.
- Green and red melting wafers (1½ cups each): Provide vibrant, glossy coatings; candy melts or colored white chocolate are good alternatives.
- Crisco (2 tablespoons): Helps smooth and shine the coating, making dipping easier and chocolate snappier; swap with coconut oil if you prefer a natural butter aroma.
- Miniature Reese’s Cups (18–20): Fun festive toppers with peanut buttery warmth; use mini chocolate candy or red and green M&Ms for variety.
- Christmas sprinkles: Adds cheerful texture and color; nonpareils or edible glitter are great festive finishes.
- Licorice or red vine candy (2–3 sticks, cut into ½ inch pieces): Mimic ornament hooks wonderfully; candy canes broken into pieces or pretzel sticks also work well.
Before You Begin
Before diving in, make sure you have all your ingredients prepped and ready — this recipe flows best when everything’s within arm’s reach. I recommend softening your cream cheese about 30 minutes prior; it should be pliable but not melted, allowing it to blend perfectly with crushed Oreos. Line your cookie sheets with parchment paper to catch any drips and help the chocolate set cleanly. Since no baking is involved, there’s no oven temperature to worry about — just patience for chilling!What You’ll Need
Essential tools to make Christmas Oreo Truffle Decorations Recipe easy and enjoyable — plus optional upgrades if you love efficiency.
How to Make Christmas Oreo Truffle Decorations Recipe
- Prepare your work surface. Line a large cookie sheet with parchment paper. This will be your resting place for the truffles as they chill and dry. It keeps everything tidy and makes cleanup effortless.
- Mix the truffle dough. In a bowl, combine the finely crushed Oreo cookies with softened cream cheese and vanilla extract. Use a sturdy spoon or a mixer on low speed. You’ll want a smooth, uniform dough with a slightly sticky sheen — that silky texture means they’ll hold together perfectly once chilled.
- Scoop and shape. Using a 1-inch cookie scoop, portion out the dough. Roll each ball gently between your palms until perfectly round and smooth, about 1 to 1½-inches across. This size creates a rich, single-bite explosion of flavor.
- Chill the truffles. Arrange your truffle balls on the parchment-lined cookie sheet, spacing them out so they don’t stick together. Refrigerate for 1 hour to let them firm up nicely — this step makes the dipping stage much easier and prevents messy melting.
- Start melting your first coating color. Approximately 5 to 10 minutes before the truffles finish chilling, place your first color of melting wafers into a heatproof bowl. Set up a double boiler by simmering 3-4 inches of water in a pot and positioning the bowl above without the bottom touching water. Stir the wafers gently as they begin to soften.
- Add Crisco and finish melting. When the wafers are halfway melted but still a bit chunky, stir in 1 tablespoon of Crisco. This addition creates a silky smooth chocolate with a beautiful glossy finish. Continue stirring until fully melted — the chocolate should flow like velvet.
- Dip the truffles. Using two forks or special dipping tools, gently submerge each chilled truffle ball in the melted coating. Roll it around so the entire surface is evenly covered in that shiny layer. Let excess drip off before placing back on the parchment paper.
- Decorate your truffles. While the coating is still wet, press an upside-down miniature Reese’s Cup gently on top of each dipped truffle. Then sprinkle with Christmas sprinkles for festive texture and color. Dollop a tiny bit of melted chocolate on the Reese’s Cup, then insert a small piece of licorice or red vine candy vertically to imitate an ornament hook. This small detail adds charm and holiday spirit.
- Chill the first half. Finish decorating half the truffle batch and slide the baking sheet into the refrigerator to set for at least 20 minutes. Firm truffles will make the next steps easier.
- Melt the second color wafers. While the first half chills, repeat the melting process with the other color of wafers—green or red—so everything is ready to go without waiting.
- Dip and decorate the remaining truffles. Just like you did the first half, dip the rest of the truffle balls in the second coating, then decorate with the miniature Reese’s Cups, sprinkles, and licorice candy pieces to keep the festive theme consistent.
- Final chill and set. Return all decorated truffles to the refrigerator for an additional 20 minutes. This step seals your truffles with a crisp, glossy shell and allows flavors to meld before serving or packaging for gifts.
Pro-Level Pointers
If your truffle dough feels too soft to handle, pop it back in the fridge for 15 more minutes — it should be firm but still pliable. When dipping, make sure the melted wafers are warm but not hot, or the truffles can melt and lose shape. Also, stirring in Crisco perfectly smooths the wafers, helping your coating dry with a satisfying snap.
Creative Variations for Christmas Oreo Truffle Decorations Recipe
- Peppermint Twist: Add ½ teaspoon peppermint extract to the truffle dough and garnish with crushed candy canes instead of sprinkles.
- Nutty Surprise: Mix finely chopped toasted pecans or almonds into the dough for added crunch and warmth.
- White Chocolate Wonderland: Use white chocolate melting wafers instead of red or green for a snowy effect, then add silver edible pearls.
- Festive Fruit: Top with dried cranberry bits alongside sprinkles for a tart contrast that balances sweetness.
- Spiced Holiday: Stir in ½ teaspoon cinnamon or pumpkin pie spice to the base mix for a cozy warming note.
- Mini Ornaments Display: Pipe tiny royal icing bows or messages on the Reese’s Cups for personalized edible gift tags.
Storage, Freezing & Reheating
- Storage: Keep truffles refrigerated in an airtight container for up to 1 week. This maintains the creamy texture and crisp coating perfectly.
- Freezing: For longer storage, freeze truffles in a single layer on a parchment-lined tray, then transfer to airtight containers or bags. Freeze for up to 2 months.
- Thawing: To thaw, place frozen truffles in the fridge overnight. Avoid room temperature thawing to prevent condensation softening the chocolate shell.
- Reheating: These truffles are best served cold or at room temperature. If needed, allow them to rest at room temp for 10 minutes before serving to unlock full flavor and silkiness.
Christmas Oreo Truffle Decorations Recipe FAQs
- Can I use regular cream cheese straight from the fridge?
For best results, let your cream cheese soften to room temperature — it blends more smoothly and prevents lumps in the dough. - My melted wafers are clumpy; how can I fix that?
Try stirring in a tablespoon of Crisco or coconut oil halfway through melting. Also, make sure you gently melt over simmering water rather than direct heat. - Can I skip the Reese’s cups or use a different topping?
Absolutely! They add a sweet peanut butter touch but feel free to swap with mini chocolates, nuts, or simply more sprinkles. - How long do these truffles last at room temperature?
Due to the cream cheese content, it’s safest to keep them refrigerated and enjoy within a week. - Is there a way to make these vegan or dairy-free?
Yes! Use dairy-free cream cheese and vegan chocolate or candy melts. Check labels carefully to keep all ingredients plant-based.
Why This Recipe Shines
- Flavor balance: Cozy, bright, and layered — never flat.
- Beginner tested: Clear steps with real-life timing cues.
- Customize-friendly: Works with pantry swaps and add-ins.
- Make ahead approved: Holds texture and flavor beautifully.
Ingredient Breakdown
- Oreo cookies (3 cups, finely crushed): The chocolatey backbone; substitute with any chocolate sandwich cookies or gluten-free versions for dietary needs.
- Cream cheese (8 oz, softened): Adds luscious silkiness and binds the mixture; you can try mascarpone for richer flavor or vegan cream cheese to keep it dairy-free.
- Vanilla extract (1 teaspoon): A subtle warm spice that rounds out flavors; almond or peppermint extract work beautifully for festive twists.
- Green and red melting wafers (1½ cups each): Provide vibrant, glossy coatings; candy melts or colored white chocolate are good alternatives.
- Crisco (2 tablespoons): Helps smooth and shine the coating, making dipping easier and chocolate snappier; swap with coconut oil if you prefer a natural butter aroma.
- Miniature Reese’s Cups (18–20): Fun festive toppers with peanut buttery warmth; use mini chocolate candy or red and green M&Ms for variety.
- Christmas sprinkles: Adds cheerful texture and color; nonpareils or edible glitter are great festive finishes.
- Licorice or red vine candy (2–3 sticks, cut into ½ inch pieces): Mimic ornament hooks wonderfully; candy canes broken into pieces or pretzel sticks also work well.
Before You Begin
Before diving in, make sure you have all your ingredients prepped and ready — this recipe flows best when everything’s within arm’s reach. I recommend softening your cream cheese about 30 minutes prior; it should be pliable but not melted, allowing it to blend perfectly with crushed Oreos. Line your cookie sheets with parchment paper to catch any drips and help the chocolate set cleanly. Since no baking is involved, there’s no oven temperature to worry about — just patience for chilling!What You’ll Need
Essential tools to make Christmas Oreo Truffle Decorations Recipe easy and enjoyable — plus optional upgrades if you love efficiency.
How to Make Christmas Oreo Truffle Decorations Recipe
- Prepare your work surface. Line a large cookie sheet with parchment paper. This will be your resting place for the truffles as they chill and dry. It keeps everything tidy and makes cleanup effortless.
- Mix the truffle dough. In a bowl, combine the finely crushed Oreo cookies with softened cream cheese and vanilla extract. Use a sturdy spoon or a mixer on low speed. You’ll want a smooth, uniform dough with a slightly sticky sheen — that silky texture means they’ll hold together perfectly once chilled.
- Scoop and shape. Using a 1-inch cookie scoop, portion out the dough. Roll each ball gently between your palms until perfectly round and smooth, about 1 to 1½-inches across. This size creates a rich, single-bite explosion of flavor.
- Chill the truffles. Arrange your truffle balls on the parchment-lined cookie sheet, spacing them out so they don’t stick together. Refrigerate for 1 hour to let them firm up nicely — this step makes the dipping stage much easier and prevents messy melting.
- Start melting your first coating color. Approximately 5 to 10 minutes before the truffles finish chilling, place your first color of melting wafers into a heatproof bowl. Set up a double boiler by simmering 3-4 inches of water in a pot and positioning the bowl above without the bottom touching water. Stir the wafers gently as they begin to soften.
- Add Crisco and finish melting. When the wafers are halfway melted but still a bit chunky, stir in 1 tablespoon of Crisco. This addition creates a silky smooth chocolate with a beautiful glossy finish. Continue stirring until fully melted — the chocolate should flow like velvet.
- Dip the truffles. Using two forks or special dipping tools, gently submerge each chilled truffle ball in the melted coating. Roll it around so the entire surface is evenly covered in that shiny layer. Let excess drip off before placing back on the parchment paper.
- Decorate your truffles. While the coating is still wet, press an upside-down miniature Reese’s Cup gently on top of each dipped truffle. Then sprinkle with Christmas sprinkles for festive texture and color. Dollop a tiny bit of melted chocolate on the Reese’s Cup, then insert a small piece of licorice or red vine candy vertically to imitate an ornament hook. This small detail adds charm and holiday spirit.
- Chill the first half. Finish decorating half the truffle batch and slide the baking sheet into the refrigerator to set for at least 20 minutes. Firm truffles will make the next steps easier.
- Melt the second color wafers. While the first half chills, repeat the melting process with the other color of wafers—green or red—so everything is ready to go without waiting.
- Dip and decorate the remaining truffles. Just like you did the first half, dip the rest of the truffle balls in the second coating, then decorate with the miniature Reese’s Cups, sprinkles, and licorice candy pieces to keep the festive theme consistent.
- Final chill and set. Return all decorated truffles to the refrigerator for an additional 20 minutes. This step seals your truffles with a crisp, glossy shell and allows flavors to meld before serving or packaging for gifts.
Pro-Level Pointers
If your truffle dough feels too soft to handle, pop it back in the fridge for 15 more minutes — it should be firm but still pliable. When dipping, make sure the melted wafers are warm but not hot, or the truffles can melt and lose shape. Also, stirring in Crisco perfectly smooths the wafers, helping your coating dry with a satisfying snap.
Creative Variations for Christmas Oreo Truffle Decorations Recipe
- Peppermint Twist: Add ½ teaspoon peppermint extract to the truffle dough and garnish with crushed candy canes instead of sprinkles.
- Nutty Surprise: Mix finely chopped toasted pecans or almonds into the dough for added crunch and warmth.
- White Chocolate Wonderland: Use white chocolate melting wafers instead of red or green for a snowy effect, then add silver edible pearls.
- Festive Fruit: Top with dried cranberry bits alongside sprinkles for a tart contrast that balances sweetness.
- Spiced Holiday: Stir in ½ teaspoon cinnamon or pumpkin pie spice to the base mix for a cozy warming note.
- Mini Ornaments Display: Pipe tiny royal icing bows or messages on the Reese’s Cups for personalized edible gift tags.
Storage, Freezing & Reheating
- Storage: Keep truffles refrigerated in an airtight container for up to 1 week. This maintains the creamy texture and crisp coating perfectly.
- Freezing: For longer storage, freeze truffles in a single layer on a parchment-lined tray, then transfer to airtight containers or bags. Freeze for up to 2 months.
- Thawing: To thaw, place frozen truffles in the fridge overnight. Avoid room temperature thawing to prevent condensation softening the chocolate shell.
- Reheating: These truffles are best served cold or at room temperature. If needed, allow them to rest at room temp for 10 minutes before serving to unlock full flavor and silkiness.
Christmas Oreo Truffle Decorations Recipe FAQs
- Can I use regular cream cheese straight from the fridge?
For best results, let your cream cheese soften to room temperature — it blends more smoothly and prevents lumps in the dough. - My melted wafers are clumpy; how can I fix that?
Try stirring in a tablespoon of Crisco or coconut oil halfway through melting. Also, make sure you gently melt over simmering water rather than direct heat. - Can I skip the Reese’s cups or use a different topping?
Absolutely! They add a sweet peanut butter touch but feel free to swap with mini chocolates, nuts, or simply more sprinkles. - How long do these truffles last at room temperature?
Due to the cream cheese content, it’s safest to keep them refrigerated and enjoy within a week. - Is there a way to make these vegan or dairy-free?
Yes! Use dairy-free cream cheese and vegan chocolate or candy melts. Check labels carefully to keep all ingredients plant-based.
The Heart of Christmas Oreo Truffle Decorations Recipe
There’s something truly special about crafting Christmas treats that feel as festive as they taste. The Christmas Oreo Truffle Decorations Recipe brings together creamy, chocolatey bliss with bright red and green touches that instantly spark joy. I love how it’s such a cozy, hands-on activity — like decorating your own little edible ornaments straight from the heart of your kitchen. As you roll the silky, slightly sticky Oreo and cream cheese mixture into smooth balls, you’ll notice how the texture hints at the luscious bite to come. Then dipping them in glossy, colorful melting wafers feels a bit like magic – watching the chocolate shimmer into a crisp-edged coat. This recipe really lets you blend delicious flavors with a sprinkle of holiday cheer, creating truffles that are perfect for gift-giving or gathering around the table with friends and family. I’m excited to share this step-by-step guide with you, so you’ll feel confident making these charming truffles in your own kitchen. Before we get started, here’s why this Christmas Oreo Truffle Decorations Recipe deserves a spot on your holiday must-make list.Why This Recipe Shines
- Flavor balance: Cozy, bright, and layered — never flat.
- Beginner tested: Clear steps with real-life timing cues.
- Customize-friendly: Works with pantry swaps and add-ins.
- Make ahead approved: Holds texture and flavor beautifully.
Ingredient Breakdown
- Oreo cookies (3 cups, finely crushed): The chocolatey backbone; substitute with any chocolate sandwich cookies or gluten-free versions for dietary needs.
- Cream cheese (8 oz, softened): Adds luscious silkiness and binds the mixture; you can try mascarpone for richer flavor or vegan cream cheese to keep it dairy-free.
- Vanilla extract (1 teaspoon): A subtle warm spice that rounds out flavors; almond or peppermint extract work beautifully for festive twists.
- Green and red melting wafers (1½ cups each): Provide vibrant, glossy coatings; candy melts or colored white chocolate are good alternatives.
- Crisco (2 tablespoons): Helps smooth and shine the coating, making dipping easier and chocolate snappier; swap with coconut oil if you prefer a natural butter aroma.
- Miniature Reese’s Cups (18–20): Fun festive toppers with peanut buttery warmth; use mini chocolate candy or red and green M&Ms for variety.
- Christmas sprinkles: Adds cheerful texture and color; nonpareils or edible glitter are great festive finishes.
- Licorice or red vine candy (2–3 sticks, cut into ½ inch pieces): Mimic ornament hooks wonderfully; candy canes broken into pieces or pretzel sticks also work well.
Before You Begin
Before diving in, make sure you have all your ingredients prepped and ready — this recipe flows best when everything’s within arm’s reach. I recommend softening your cream cheese about 30 minutes prior; it should be pliable but not melted, allowing it to blend perfectly with crushed Oreos. Line your cookie sheets with parchment paper to catch any drips and help the chocolate set cleanly. Since no baking is involved, there’s no oven temperature to worry about — just patience for chilling!What You’ll Need
Essential tools to make Christmas Oreo Truffle Decorations Recipe easy and enjoyable — plus optional upgrades if you love efficiency.
How to Make Christmas Oreo Truffle Decorations Recipe
- Prepare your work surface. Line a large cookie sheet with parchment paper. This will be your resting place for the truffles as they chill and dry. It keeps everything tidy and makes cleanup effortless.
- Mix the truffle dough. In a bowl, combine the finely crushed Oreo cookies with softened cream cheese and vanilla extract. Use a sturdy spoon or a mixer on low speed. You’ll want a smooth, uniform dough with a slightly sticky sheen — that silky texture means they’ll hold together perfectly once chilled.
- Scoop and shape. Using a 1-inch cookie scoop, portion out the dough. Roll each ball gently between your palms until perfectly round and smooth, about 1 to 1½-inches across. This size creates a rich, single-bite explosion of flavor.
- Chill the truffles. Arrange your truffle balls on the parchment-lined cookie sheet, spacing them out so they don’t stick together. Refrigerate for 1 hour to let them firm up nicely — this step makes the dipping stage much easier and prevents messy melting.
- Start melting your first coating color. Approximately 5 to 10 minutes before the truffles finish chilling, place your first color of melting wafers into a heatproof bowl. Set up a double boiler by simmering 3-4 inches of water in a pot and positioning the bowl above without the bottom touching water. Stir the wafers gently as they begin to soften.
- Add Crisco and finish melting. When the wafers are halfway melted but still a bit chunky, stir in 1 tablespoon of Crisco. This addition creates a silky smooth chocolate with a beautiful glossy finish. Continue stirring until fully melted — the chocolate should flow like velvet.
- Dip the truffles. Using two forks or special dipping tools, gently submerge each chilled truffle ball in the melted coating. Roll it around so the entire surface is evenly covered in that shiny layer. Let excess drip off before placing back on the parchment paper.
- Decorate your truffles. While the coating is still wet, press an upside-down miniature Reese’s Cup gently on top of each dipped truffle. Then sprinkle with Christmas sprinkles for festive texture and color. Dollop a tiny bit of melted chocolate on the Reese’s Cup, then insert a small piece of licorice or red vine candy vertically to imitate an ornament hook. This small detail adds charm and holiday spirit.
- Chill the first half. Finish decorating half the truffle batch and slide the baking sheet into the refrigerator to set for at least 20 minutes. Firm truffles will make the next steps easier.
- Melt the second color wafers. While the first half chills, repeat the melting process with the other color of wafers—green or red—so everything is ready to go without waiting.
- Dip and decorate the remaining truffles. Just like you did the first half, dip the rest of the truffle balls in the second coating, then decorate with the miniature Reese’s Cups, sprinkles, and licorice candy pieces to keep the festive theme consistent.
- Final chill and set. Return all decorated truffles to the refrigerator for an additional 20 minutes. This step seals your truffles with a crisp, glossy shell and allows flavors to meld before serving or packaging for gifts.
Pro-Level Pointers
If your truffle dough feels too soft to handle, pop it back in the fridge for 15 more minutes — it should be firm but still pliable. When dipping, make sure the melted wafers are warm but not hot, or the truffles can melt and lose shape. Also, stirring in Crisco perfectly smooths the wafers, helping your coating dry with a satisfying snap.
Creative Variations for Christmas Oreo Truffle Decorations Recipe
- Peppermint Twist: Add ½ teaspoon peppermint extract to the truffle dough and garnish with crushed candy canes instead of sprinkles.
- Nutty Surprise: Mix finely chopped toasted pecans or almonds into the dough for added crunch and warmth.
- White Chocolate Wonderland: Use white chocolate melting wafers instead of red or green for a snowy effect, then add silver edible pearls.
- Festive Fruit: Top with dried cranberry bits alongside sprinkles for a tart contrast that balances sweetness.
- Spiced Holiday: Stir in ½ teaspoon cinnamon or pumpkin pie spice to the base mix for a cozy warming note.
- Mini Ornaments Display: Pipe tiny royal icing bows or messages on the Reese’s Cups for personalized edible gift tags.
Storage, Freezing & Reheating
- Storage: Keep truffles refrigerated in an airtight container for up to 1 week. This maintains the creamy texture and crisp coating perfectly.
- Freezing: For longer storage, freeze truffles in a single layer on a parchment-lined tray, then transfer to airtight containers or bags. Freeze for up to 2 months.
- Thawing: To thaw, place frozen truffles in the fridge overnight. Avoid room temperature thawing to prevent condensation softening the chocolate shell.
- Reheating: These truffles are best served cold or at room temperature. If needed, allow them to rest at room temp for 10 minutes before serving to unlock full flavor and silkiness.
Christmas Oreo Truffle Decorations Recipe FAQs
- Can I use regular cream cheese straight from the fridge?
For best results, let your cream cheese soften to room temperature — it blends more smoothly and prevents lumps in the dough. - My melted wafers are clumpy; how can I fix that?
Try stirring in a tablespoon of Crisco or coconut oil halfway through melting. Also, make sure you gently melt over simmering water rather than direct heat. - Can I skip the Reese’s cups or use a different topping?
Absolutely! They add a sweet peanut butter touch but feel free to swap with mini chocolates, nuts, or simply more sprinkles. - How long do these truffles last at room temperature?
Due to the cream cheese content, it’s safest to keep them refrigerated and enjoy within a week. - Is there a way to make these vegan or dairy-free?
Yes! Use dairy-free cream cheese and vegan chocolate or candy melts. Check labels carefully to keep all ingredients plant-based.
Why This Recipe Shines
- Flavor balance: Cozy, bright, and layered — never flat.
- Beginner tested: Clear steps with real-life timing cues.
- Customize-friendly: Works with pantry swaps and add-ins.
- Make ahead approved: Holds texture and flavor beautifully.
Ingredient Breakdown
- Oreo cookies (3 cups, finely crushed): The chocolatey backbone; substitute with any chocolate sandwich cookies or gluten-free versions for dietary needs.
- Cream cheese (8 oz, softened): Adds luscious silkiness and binds the mixture; you can try mascarpone for richer flavor or vegan cream cheese to keep it dairy-free.
- Vanilla extract (1 teaspoon): A subtle warm spice that rounds out flavors; almond or peppermint extract work beautifully for festive twists.
- Green and red melting wafers (1½ cups each): Provide vibrant, glossy coatings; candy melts or colored white chocolate are good alternatives.
- Crisco (2 tablespoons): Helps smooth and shine the coating, making dipping easier and chocolate snappier; swap with coconut oil if you prefer a natural butter aroma.
- Miniature Reese’s Cups (18–20): Fun festive toppers with peanut buttery warmth; use mini chocolate candy or red and green M&Ms for variety.
- Christmas sprinkles: Adds cheerful texture and color; nonpareils or edible glitter are great festive finishes.
- Licorice or red vine candy (2–3 sticks, cut into ½ inch pieces): Mimic ornament hooks wonderfully; candy canes broken into pieces or pretzel sticks also work well.
Before You Begin
Before diving in, make sure you have all your ingredients prepped and ready — this recipe flows best when everything’s within arm’s reach. I recommend softening your cream cheese about 30 minutes prior; it should be pliable but not melted, allowing it to blend perfectly with crushed Oreos. Line your cookie sheets with parchment paper to catch any drips and help the chocolate set cleanly. Since no baking is involved, there’s no oven temperature to worry about — just patience for chilling!What You’ll Need
Essential tools to make Christmas Oreo Truffle Decorations Recipe easy and enjoyable — plus optional upgrades if you love efficiency.
How to Make Christmas Oreo Truffle Decorations Recipe
- Prepare your work surface. Line a large cookie sheet with parchment paper. This will be your resting place for the truffles as they chill and dry. It keeps everything tidy and makes cleanup effortless.
- Mix the truffle dough. In a bowl, combine the finely crushed Oreo cookies with softened cream cheese and vanilla extract. Use a sturdy spoon or a mixer on low speed. You’ll want a smooth, uniform dough with a slightly sticky sheen — that silky texture means they’ll hold together perfectly once chilled.
- Scoop and shape. Using a 1-inch cookie scoop, portion out the dough. Roll each ball gently between your palms until perfectly round and smooth, about 1 to 1½-inches across. This size creates a rich, single-bite explosion of flavor.
- Chill the truffles. Arrange your truffle balls on the parchment-lined cookie sheet, spacing them out so they don’t stick together. Refrigerate for 1 hour to let them firm up nicely — this step makes the dipping stage much easier and prevents messy melting.
- Start melting your first coating color. Approximately 5 to 10 minutes before the truffles finish chilling, place your first color of melting wafers into a heatproof bowl. Set up a double boiler by simmering 3-4 inches of water in a pot and positioning the bowl above without the bottom touching water. Stir the wafers gently as they begin to soften.
- Add Crisco and finish melting. When the wafers are halfway melted but still a bit chunky, stir in 1 tablespoon of Crisco. This addition creates a silky smooth chocolate with a beautiful glossy finish. Continue stirring until fully melted — the chocolate should flow like velvet.
- Dip the truffles. Using two forks or special dipping tools, gently submerge each chilled truffle ball in the melted coating. Roll it around so the entire surface is evenly covered in that shiny layer. Let excess drip off before placing back on the parchment paper.
- Decorate your truffles. While the coating is still wet, press an upside-down miniature Reese’s Cup gently on top of each dipped truffle. Then sprinkle with Christmas sprinkles for festive texture and color. Dollop a tiny bit of melted chocolate on the Reese’s Cup, then insert a small piece of licorice or red vine candy vertically to imitate an ornament hook. This small detail adds charm and holiday spirit.
- Chill the first half. Finish decorating half the truffle batch and slide the baking sheet into the refrigerator to set for at least 20 minutes. Firm truffles will make the next steps easier.
- Melt the second color wafers. While the first half chills, repeat the melting process with the other color of wafers—green or red—so everything is ready to go without waiting.
- Dip and decorate the remaining truffles. Just like you did the first half, dip the rest of the truffle balls in the second coating, then decorate with the miniature Reese’s Cups, sprinkles, and licorice candy pieces to keep the festive theme consistent.
- Final chill and set. Return all decorated truffles to the refrigerator for an additional 20 minutes. This step seals your truffles with a crisp, glossy shell and allows flavors to meld before serving or packaging for gifts.
Pro-Level Pointers
If your truffle dough feels too soft to handle, pop it back in the fridge for 15 more minutes — it should be firm but still pliable. When dipping, make sure the melted wafers are warm but not hot, or the truffles can melt and lose shape. Also, stirring in Crisco perfectly smooths the wafers, helping your coating dry with a satisfying snap.
Creative Variations for Christmas Oreo Truffle Decorations Recipe
- Peppermint Twist: Add ½ teaspoon peppermint extract to the truffle dough and garnish with crushed candy canes instead of sprinkles.
- Nutty Surprise: Mix finely chopped toasted pecans or almonds into the dough for added crunch and warmth.
- White Chocolate Wonderland: Use white chocolate melting wafers instead of red or green for a snowy effect, then add silver edible pearls.
- Festive Fruit: Top with dried cranberry bits alongside sprinkles for a tart contrast that balances sweetness.
- Spiced Holiday: Stir in ½ teaspoon cinnamon or pumpkin pie spice to the base mix for a cozy warming note.
- Mini Ornaments Display: Pipe tiny royal icing bows or messages on the Reese’s Cups for personalized edible gift tags.
Storage, Freezing & Reheating
- Storage: Keep truffles refrigerated in an airtight container for up to 1 week. This maintains the creamy texture and crisp coating perfectly.
- Freezing: For longer storage, freeze truffles in a single layer on a parchment-lined tray, then transfer to airtight containers or bags. Freeze for up to 2 months.
- Thawing: To thaw, place frozen truffles in the fridge overnight. Avoid room temperature thawing to prevent condensation softening the chocolate shell.
- Reheating: These truffles are best served cold or at room temperature. If needed, allow them to rest at room temp for 10 minutes before serving to unlock full flavor and silkiness.
Christmas Oreo Truffle Decorations Recipe FAQs
- Can I use regular cream cheese straight from the fridge?
For best results, let your cream cheese soften to room temperature — it blends more smoothly and prevents lumps in the dough. - My melted wafers are clumpy; how can I fix that?
Try stirring in a tablespoon of Crisco or coconut oil halfway through melting. Also, make sure you gently melt over simmering water rather than direct heat. - Can I skip the Reese’s cups or use a different topping?
Absolutely! They add a sweet peanut butter touch but feel free to swap with mini chocolates, nuts, or simply more sprinkles. - How long do these truffles last at room temperature?
Due to the cream cheese content, it’s safest to keep them refrigerated and enjoy within a week. - Is there a way to make these vegan or dairy-free?
Yes! Use dairy-free cream cheese and vegan chocolate or candy melts. Check labels carefully to keep all ingredients plant-based.
The Heart of Christmas Oreo Truffle Decorations Recipe
There’s something truly special about crafting Christmas treats that feel as festive as they taste. The Christmas Oreo Truffle Decorations Recipe brings together creamy, chocolatey bliss with bright red and green touches that instantly spark joy. I love how it’s such a cozy, hands-on activity — like decorating your own little edible ornaments straight from the heart of your kitchen. As you roll the silky, slightly sticky Oreo and cream cheese mixture into smooth balls, you’ll notice how the texture hints at the luscious bite to come. Then dipping them in glossy, colorful melting wafers feels a bit like magic – watching the chocolate shimmer into a crisp-edged coat. This recipe really lets you blend delicious flavors with a sprinkle of holiday cheer, creating truffles that are perfect for gift-giving or gathering around the table with friends and family. I’m excited to share this step-by-step guide with you, so you’ll feel confident making these charming truffles in your own kitchen. Before we get started, here’s why this Christmas Oreo Truffle Decorations Recipe deserves a spot on your holiday must-make list.Why This Recipe Shines
- Flavor balance: Cozy, bright, and layered — never flat.
- Beginner tested: Clear steps with real-life timing cues.
- Customize-friendly: Works with pantry swaps and add-ins.
- Make ahead approved: Holds texture and flavor beautifully.
Ingredient Breakdown
- Oreo cookies (3 cups, finely crushed): The chocolatey backbone; substitute with any chocolate sandwich cookies or gluten-free versions for dietary needs.
- Cream cheese (8 oz, softened): Adds luscious silkiness and binds the mixture; you can try mascarpone for richer flavor or vegan cream cheese to keep it dairy-free.
- Vanilla extract (1 teaspoon): A subtle warm spice that rounds out flavors; almond or peppermint extract work beautifully for festive twists.
- Green and red melting wafers (1½ cups each): Provide vibrant, glossy coatings; candy melts or colored white chocolate are good alternatives.
- Crisco (2 tablespoons): Helps smooth and shine the coating, making dipping easier and chocolate snappier; swap with coconut oil if you prefer a natural butter aroma.
- Miniature Reese’s Cups (18–20): Fun festive toppers with peanut buttery warmth; use mini chocolate candy or red and green M&Ms for variety.
- Christmas sprinkles: Adds cheerful texture and color; nonpareils or edible glitter are great festive finishes.
- Licorice or red vine candy (2–3 sticks, cut into ½ inch pieces): Mimic ornament hooks wonderfully; candy canes broken into pieces or pretzel sticks also work well.
Before You Begin
Before diving in, make sure you have all your ingredients prepped and ready — this recipe flows best when everything’s within arm’s reach. I recommend softening your cream cheese about 30 minutes prior; it should be pliable but not melted, allowing it to blend perfectly with crushed Oreos. Line your cookie sheets with parchment paper to catch any drips and help the chocolate set cleanly. Since no baking is involved, there’s no oven temperature to worry about — just patience for chilling!What You’ll Need
Essential tools to make Christmas Oreo Truffle Decorations Recipe easy and enjoyable — plus optional upgrades if you love efficiency.
How to Make Christmas Oreo Truffle Decorations Recipe
- Prepare your work surface. Line a large cookie sheet with parchment paper. This will be your resting place for the truffles as they chill and dry. It keeps everything tidy and makes cleanup effortless.
- Mix the truffle dough. In a bowl, combine the finely crushed Oreo cookies with softened cream cheese and vanilla extract. Use a sturdy spoon or a mixer on low speed. You’ll want a smooth, uniform dough with a slightly sticky sheen — that silky texture means they’ll hold together perfectly once chilled.
- Scoop and shape. Using a 1-inch cookie scoop, portion out the dough. Roll each ball gently between your palms until perfectly round and smooth, about 1 to 1½-inches across. This size creates a rich, single-bite explosion of flavor.
- Chill the truffles. Arrange your truffle balls on the parchment-lined cookie sheet, spacing them out so they don’t stick together. Refrigerate for 1 hour to let them firm up nicely — this step makes the dipping stage much easier and prevents messy melting.
- Start melting your first coating color. Approximately 5 to 10 minutes before the truffles finish chilling, place your first color of melting wafers into a heatproof bowl. Set up a double boiler by simmering 3-4 inches of water in a pot and positioning the bowl above without the bottom touching water. Stir the wafers gently as they begin to soften.
- Add Crisco and finish melting. When the wafers are halfway melted but still a bit chunky, stir in 1 tablespoon of Crisco. This addition creates a silky smooth chocolate with a beautiful glossy finish. Continue stirring until fully melted — the chocolate should flow like velvet.
- Dip the truffles. Using two forks or special dipping tools, gently submerge each chilled truffle ball in the melted coating. Roll it around so the entire surface is evenly covered in that shiny layer. Let excess drip off before placing back on the parchment paper.
- Decorate your truffles. While the coating is still wet, press an upside-down miniature Reese’s Cup gently on top of each dipped truffle. Then sprinkle with Christmas sprinkles for festive texture and color. Dollop a tiny bit of melted chocolate on the Reese’s Cup, then insert a small piece of licorice or red vine candy vertically to imitate an ornament hook. This small detail adds charm and holiday spirit.
- Chill the first half. Finish decorating half the truffle batch and slide the baking sheet into the refrigerator to set for at least 20 minutes. Firm truffles will make the next steps easier.
- Melt the second color wafers. While the first half chills, repeat the melting process with the other color of wafers—green or red—so everything is ready to go without waiting.
- Dip and decorate the remaining truffles. Just like you did the first half, dip the rest of the truffle balls in the second coating, then decorate with the miniature Reese’s Cups, sprinkles, and licorice candy pieces to keep the festive theme consistent.
- Final chill and set. Return all decorated truffles to the refrigerator for an additional 20 minutes. This step seals your truffles with a crisp, glossy shell and allows flavors to meld before serving or packaging for gifts.
Pro-Level Pointers
If your truffle dough feels too soft to handle, pop it back in the fridge for 15 more minutes — it should be firm but still pliable. When dipping, make sure the melted wafers are warm but not hot, or the truffles can melt and lose shape. Also, stirring in Crisco perfectly smooths the wafers, helping your coating dry with a satisfying snap.
Creative Variations for Christmas Oreo Truffle Decorations Recipe
- Peppermint Twist: Add ½ teaspoon peppermint extract to the truffle dough and garnish with crushed candy canes instead of sprinkles.
- Nutty Surprise: Mix finely chopped toasted pecans or almonds into the dough for added crunch and warmth.
- White Chocolate Wonderland: Use white chocolate melting wafers instead of red or green for a snowy effect, then add silver edible pearls.
- Festive Fruit: Top with dried cranberry bits alongside sprinkles for a tart contrast that balances sweetness.
- Spiced Holiday: Stir in ½ teaspoon cinnamon or pumpkin pie spice to the base mix for a cozy warming note.
- Mini Ornaments Display: Pipe tiny royal icing bows or messages on the Reese’s Cups for personalized edible gift tags.
Storage, Freezing & Reheating
- Storage: Keep truffles refrigerated in an airtight container for up to 1 week. This maintains the creamy texture and crisp coating perfectly.
- Freezing: For longer storage, freeze truffles in a single layer on a parchment-lined tray, then transfer to airtight containers or bags. Freeze for up to 2 months.
- Thawing: To thaw, place frozen truffles in the fridge overnight. Avoid room temperature thawing to prevent condensation softening the chocolate shell.
- Reheating: These truffles are best served cold or at room temperature. If needed, allow them to rest at room temp for 10 minutes before serving to unlock full flavor and silkiness.
Christmas Oreo Truffle Decorations Recipe FAQs
- Can I use regular cream cheese straight from the fridge?
For best results, let your cream cheese soften to room temperature — it blends more smoothly and prevents lumps in the dough. - My melted wafers are clumpy; how can I fix that?
Try stirring in a tablespoon of Crisco or coconut oil halfway through melting. Also, make sure you gently melt over simmering water rather than direct heat. - Can I skip the Reese’s cups or use a different topping?
Absolutely! They add a sweet peanut butter touch but feel free to swap with mini chocolates, nuts, or simply more sprinkles. - How long do these truffles last at room temperature?
Due to the cream cheese content, it’s safest to keep them refrigerated and enjoy within a week. - Is there a way to make these vegan or dairy-free?
Yes! Use dairy-free cream cheese and vegan chocolate or candy melts. Check labels carefully to keep all ingredients plant-based.
Why This Recipe Shines
- Flavor balance: Cozy, bright, and layered — never flat.
- Beginner tested: Clear steps with real-life timing cues.
- Customize-friendly: Works with pantry swaps and add-ins.
- Make ahead approved: Holds texture and flavor beautifully.
Ingredient Breakdown
- Oreo cookies (3 cups, finely crushed): The chocolatey backbone; substitute with any chocolate sandwich cookies or gluten-free versions for dietary needs.
- Cream cheese (8 oz, softened): Adds luscious silkiness and binds the mixture; you can try mascarpone for richer flavor or vegan cream cheese to keep it dairy-free.
- Vanilla extract (1 teaspoon): A subtle warm spice that rounds out flavors; almond or peppermint extract work beautifully for festive twists.
- Green and red melting wafers (1½ cups each): Provide vibrant, glossy coatings; candy melts or colored white chocolate are good alternatives.
- Crisco (2 tablespoons): Helps smooth and shine the coating, making dipping easier and chocolate snappier; swap with coconut oil if you prefer a natural butter aroma.
- Miniature Reese’s Cups (18–20): Fun festive toppers with peanut buttery warmth; use mini chocolate candy or red and green M&Ms for variety.
- Christmas sprinkles: Adds cheerful texture and color; nonpareils or edible glitter are great festive finishes.
- Licorice or red vine candy (2–3 sticks, cut into ½ inch pieces): Mimic ornament hooks wonderfully; candy canes broken into pieces or pretzel sticks also work well.
Before You Begin
Before diving in, make sure you have all your ingredients prepped and ready — this recipe flows best when everything’s within arm’s reach. I recommend softening your cream cheese about 30 minutes prior; it should be pliable but not melted, allowing it to blend perfectly with crushed Oreos. Line your cookie sheets with parchment paper to catch any drips and help the chocolate set cleanly. Since no baking is involved, there’s no oven temperature to worry about — just patience for chilling!What You’ll Need
Essential tools to make Christmas Oreo Truffle Decorations Recipe easy and enjoyable — plus optional upgrades if you love efficiency.
How to Make Christmas Oreo Truffle Decorations Recipe
- Prepare your work surface. Line a large cookie sheet with parchment paper. This will be your resting place for the truffles as they chill and dry. It keeps everything tidy and makes cleanup effortless.
- Mix the truffle dough. In a bowl, combine the finely crushed Oreo cookies with softened cream cheese and vanilla extract. Use a sturdy spoon or a mixer on low speed. You’ll want a smooth, uniform dough with a slightly sticky sheen — that silky texture means they’ll hold together perfectly once chilled.
- Scoop and shape. Using a 1-inch cookie scoop, portion out the dough. Roll each ball gently between your palms until perfectly round and smooth, about 1 to 1½-inches across. This size creates a rich, single-bite explosion of flavor.
- Chill the truffles. Arrange your truffle balls on the parchment-lined cookie sheet, spacing them out so they don’t stick together. Refrigerate for 1 hour to let them firm up nicely — this step makes the dipping stage much easier and prevents messy melting.
- Start melting your first coating color. Approximately 5 to 10 minutes before the truffles finish chilling, place your first color of melting wafers into a heatproof bowl. Set up a double boiler by simmering 3-4 inches of water in a pot and positioning the bowl above without the bottom touching water. Stir the wafers gently as they begin to soften.
- Add Crisco and finish melting. When the wafers are halfway melted but still a bit chunky, stir in 1 tablespoon of Crisco. This addition creates a silky smooth chocolate with a beautiful glossy finish. Continue stirring until fully melted — the chocolate should flow like velvet.
- Dip the truffles. Using two forks or special dipping tools, gently submerge each chilled truffle ball in the melted coating. Roll it around so the entire surface is evenly covered in that shiny layer. Let excess drip off before placing back on the parchment paper.
- Decorate your truffles. While the coating is still wet, press an upside-down miniature Reese’s Cup gently on top of each dipped truffle. Then sprinkle with Christmas sprinkles for festive texture and color. Dollop a tiny bit of melted chocolate on the Reese’s Cup, then insert a small piece of licorice or red vine candy vertically to imitate an ornament hook. This small detail adds charm and holiday spirit.
- Chill the first half. Finish decorating half the truffle batch and slide the baking sheet into the refrigerator to set for at least 20 minutes. Firm truffles will make the next steps easier.
- Melt the second color wafers. While the first half chills, repeat the melting process with the other color of wafers—green or red—so everything is ready to go without waiting.
- Dip and decorate the remaining truffles. Just like you did the first half, dip the rest of the truffle balls in the second coating, then decorate with the miniature Reese’s Cups, sprinkles, and licorice candy pieces to keep the festive theme consistent.
- Final chill and set. Return all decorated truffles to the refrigerator for an additional 20 minutes. This step seals your truffles with a crisp, glossy shell and allows flavors to meld before serving or packaging for gifts.
Pro-Level Pointers
If your truffle dough feels too soft to handle, pop it back in the fridge for 15 more minutes — it should be firm but still pliable. When dipping, make sure the melted wafers are warm but not hot, or the truffles can melt and lose shape. Also, stirring in Crisco perfectly smooths the wafers, helping your coating dry with a satisfying snap.
Creative Variations for Christmas Oreo Truffle Decorations Recipe
- Peppermint Twist: Add ½ teaspoon peppermint extract to the truffle dough and garnish with crushed candy canes instead of sprinkles.
- Nutty Surprise: Mix finely chopped toasted pecans or almonds into the dough for added crunch and warmth.
- White Chocolate Wonderland: Use white chocolate melting wafers instead of red or green for a snowy effect, then add silver edible pearls.
- Festive Fruit: Top with dried cranberry bits alongside sprinkles for a tart contrast that balances sweetness.
- Spiced Holiday: Stir in ½ teaspoon cinnamon or pumpkin pie spice to the base mix for a cozy warming note.
- Mini Ornaments Display: Pipe tiny royal icing bows or messages on the Reese’s Cups for personalized edible gift tags.
Storage, Freezing & Reheating
- Storage: Keep truffles refrigerated in an airtight container for up to 1 week. This maintains the creamy texture and crisp coating perfectly.
- Freezing: For longer storage, freeze truffles in a single layer on a parchment-lined tray, then transfer to airtight containers or bags. Freeze for up to 2 months.
- Thawing: To thaw, place frozen truffles in the fridge overnight. Avoid room temperature thawing to prevent condensation softening the chocolate shell.
- Reheating: These truffles are best served cold or at room temperature. If needed, allow them to rest at room temp for 10 minutes before serving to unlock full flavor and silkiness.
Christmas Oreo Truffle Decorations Recipe FAQs
- Can I use regular cream cheese straight from the fridge?
For best results, let your cream cheese soften to room temperature — it blends more smoothly and prevents lumps in the dough. - My melted wafers are clumpy; how can I fix that?
Try stirring in a tablespoon of Crisco or coconut oil halfway through melting. Also, make sure you gently melt over simmering water rather than direct heat. - Can I skip the Reese’s cups or use a different topping?
Absolutely! They add a sweet peanut butter touch but feel free to swap with mini chocolates, nuts, or simply more sprinkles. - How long do these truffles last at room temperature?
Due to the cream cheese content, it’s safest to keep them refrigerated and enjoy within a week. - Is there a way to make these vegan or dairy-free?
Yes! Use dairy-free cream cheese and vegan chocolate or candy melts. Check labels carefully to keep all ingredients plant-based.
The Heart of Christmas Oreo Truffle Decorations Recipe
There’s something truly special about crafting Christmas treats that feel as festive as they taste. The Christmas Oreo Truffle Decorations Recipe brings together creamy, chocolatey bliss with bright red and green touches that instantly spark joy. I love how it’s such a cozy, hands-on activity — like decorating your own little edible ornaments straight from the heart of your kitchen. As you roll the silky, slightly sticky Oreo and cream cheese mixture into smooth balls, you’ll notice how the texture hints at the luscious bite to come. Then dipping them in glossy, colorful melting wafers feels a bit like magic – watching the chocolate shimmer into a crisp-edged coat. This recipe really lets you blend delicious flavors with a sprinkle of holiday cheer, creating truffles that are perfect for gift-giving or gathering around the table with friends and family. I’m excited to share this step-by-step guide with you, so you’ll feel confident making these charming truffles in your own kitchen. Before we get started, here’s why this Christmas Oreo Truffle Decorations Recipe deserves a spot on your holiday must-make list.Why This Recipe Shines
- Flavor balance: Cozy, bright, and layered — never flat.
- Beginner tested: Clear steps with real-life timing cues.
- Customize-friendly: Works with pantry swaps and add-ins.
- Make ahead approved: Holds texture and flavor beautifully.
Ingredient Breakdown
- Oreo cookies (3 cups, finely crushed): The chocolatey backbone; substitute with any chocolate sandwich cookies or gluten-free versions for dietary needs.
- Cream cheese (8 oz, softened): Adds luscious silkiness and binds the mixture; you can try mascarpone for richer flavor or vegan cream cheese to keep it dairy-free.
- Vanilla extract (1 teaspoon): A subtle warm spice that rounds out flavors; almond or peppermint extract work beautifully for festive twists.
- Green and red melting wafers (1½ cups each): Provide vibrant, glossy coatings; candy melts or colored white chocolate are good alternatives.
- Crisco (2 tablespoons): Helps smooth and shine the coating, making dipping easier and chocolate snappier; swap with coconut oil if you prefer a natural butter aroma.
- Miniature Reese’s Cups (18–20): Fun festive toppers with peanut buttery warmth; use mini chocolate candy or red and green M&Ms for variety.
- Christmas sprinkles: Adds cheerful texture and color; nonpareils or edible glitter are great festive finishes.
- Licorice or red vine candy (2–3 sticks, cut into ½ inch pieces): Mimic ornament hooks wonderfully; candy canes broken into pieces or pretzel sticks also work well.
Before You Begin
Before diving in, make sure you have all your ingredients prepped and ready — this recipe flows best when everything’s within arm’s reach. I recommend softening your cream cheese about 30 minutes prior; it should be pliable but not melted, allowing it to blend perfectly with crushed Oreos. Line your cookie sheets with parchment paper to catch any drips and help the chocolate set cleanly. Since no baking is involved, there’s no oven temperature to worry about — just patience for chilling!What You’ll Need
Essential tools to make Christmas Oreo Truffle Decorations Recipe easy and enjoyable — plus optional upgrades if you love efficiency.
How to Make Christmas Oreo Truffle Decorations Recipe
- Prepare your work surface. Line a large cookie sheet with parchment paper. This will be your resting place for the truffles as they chill and dry. It keeps everything tidy and makes cleanup effortless.
- Mix the truffle dough. In a bowl, combine the finely crushed Oreo cookies with softened cream cheese and vanilla extract. Use a sturdy spoon or a mixer on low speed. You’ll want a smooth, uniform dough with a slightly sticky sheen — that silky texture means they’ll hold together perfectly once chilled.
- Scoop and shape. Using a 1-inch cookie scoop, portion out the dough. Roll each ball gently between your palms until perfectly round and smooth, about 1 to 1½-inches across. This size creates a rich, single-bite explosion of flavor.
- Chill the truffles. Arrange your truffle balls on the parchment-lined cookie sheet, spacing them out so they don’t stick together. Refrigerate for 1 hour to let them firm up nicely — this step makes the dipping stage much easier and prevents messy melting.
- Start melting your first coating color. Approximately 5 to 10 minutes before the truffles finish chilling, place your first color of melting wafers into a heatproof bowl. Set up a double boiler by simmering 3-4 inches of water in a pot and positioning the bowl above without the bottom touching water. Stir the wafers gently as they begin to soften.
- Add Crisco and finish melting. When the wafers are halfway melted but still a bit chunky, stir in 1 tablespoon of Crisco. This addition creates a silky smooth chocolate with a beautiful glossy finish. Continue stirring until fully melted — the chocolate should flow like velvet.
- Dip the truffles. Using two forks or special dipping tools, gently submerge each chilled truffle ball in the melted coating. Roll it around so the entire surface is evenly covered in that shiny layer. Let excess drip off before placing back on the parchment paper.
- Decorate your truffles. While the coating is still wet, press an upside-down miniature Reese’s Cup gently on top of each dipped truffle. Then sprinkle with Christmas sprinkles for festive texture and color. Dollop a tiny bit of melted chocolate on the Reese’s Cup, then insert a small piece of licorice or red vine candy vertically to imitate an ornament hook. This small detail adds charm and holiday spirit.
- Chill the first half. Finish decorating half the truffle batch and slide the baking sheet into the refrigerator to set for at least 20 minutes. Firm truffles will make the next steps easier.
- Melt the second color wafers. While the first half chills, repeat the melting process with the other color of wafers—green or red—so everything is ready to go without waiting.
- Dip and decorate the remaining truffles. Just like you did the first half, dip the rest of the truffle balls in the second coating, then decorate with the miniature Reese’s Cups, sprinkles, and licorice candy pieces to keep the festive theme consistent.
- Final chill and set. Return all decorated truffles to the refrigerator for an additional 20 minutes. This step seals your truffles with a crisp, glossy shell and allows flavors to meld before serving or packaging for gifts.
Pro-Level Pointers
If your truffle dough feels too soft to handle, pop it back in the fridge for 15 more minutes — it should be firm but still pliable. When dipping, make sure the melted wafers are warm but not hot, or the truffles can melt and lose shape. Also, stirring in Crisco perfectly smooths the wafers, helping your coating dry with a satisfying snap.
Creative Variations for Christmas Oreo Truffle Decorations Recipe
- Peppermint Twist: Add ½ teaspoon peppermint extract to the truffle dough and garnish with crushed candy canes instead of sprinkles.
- Nutty Surprise: Mix finely chopped toasted pecans or almonds into the dough for added crunch and warmth.
- White Chocolate Wonderland: Use white chocolate melting wafers instead of red or green for a snowy effect, then add silver edible pearls.
- Festive Fruit: Top with dried cranberry bits alongside sprinkles for a tart contrast that balances sweetness.
- Spiced Holiday: Stir in ½ teaspoon cinnamon or pumpkin pie spice to the base mix for a cozy warming note.
- Mini Ornaments Display: Pipe tiny royal icing bows or messages on the Reese’s Cups for personalized edible gift tags.
Storage, Freezing & Reheating
- Storage: Keep truffles refrigerated in an airtight container for up to 1 week. This maintains the creamy texture and crisp coating perfectly.
- Freezing: For longer storage, freeze truffles in a single layer on a parchment-lined tray, then transfer to airtight containers or bags. Freeze for up to 2 months.
- Thawing: To thaw, place frozen truffles in the fridge overnight. Avoid room temperature thawing to prevent condensation softening the chocolate shell.
- Reheating: These truffles are best served cold or at room temperature. If needed, allow them to rest at room temp for 10 minutes before serving to unlock full flavor and silkiness.
Christmas Oreo Truffle Decorations Recipe FAQs
- Can I use regular cream cheese straight from the fridge?
For best results, let your cream cheese soften to room temperature — it blends more smoothly and prevents lumps in the dough. - My melted wafers are clumpy; how can I fix that?
Try stirring in a tablespoon of Crisco or coconut oil halfway through melting. Also, make sure you gently melt over simmering water rather than direct heat. - Can I skip the Reese’s cups or use a different topping?
Absolutely! They add a sweet peanut butter touch but feel free to swap with mini chocolates, nuts, or simply more sprinkles. - How long do these truffles last at room temperature?
Due to the cream cheese content, it’s safest to keep them refrigerated and enjoy within a week. - Is there a way to make these vegan or dairy-free?
Yes! Use dairy-free cream cheese and vegan chocolate or candy melts. Check labels carefully to keep all ingredients plant-based.
Why This Recipe Shines
- Flavor balance: Cozy, bright, and layered — never flat.
- Beginner tested: Clear steps with real-life timing cues.
- Customize-friendly: Works with pantry swaps and add-ins.
- Make ahead approved: Holds texture and flavor beautifully.
Ingredient Breakdown
- Oreo cookies (3 cups, finely crushed): The chocolatey backbone; substitute with any chocolate sandwich cookies or gluten-free versions for dietary needs.
- Cream cheese (8 oz, softened): Adds luscious silkiness and binds the mixture; you can try mascarpone for richer flavor or vegan cream cheese to keep it dairy-free.
- Vanilla extract (1 teaspoon): A subtle warm spice that rounds out flavors; almond or peppermint extract work beautifully for festive twists.
- Green and red melting wafers (1½ cups each): Provide vibrant, glossy coatings; candy melts or colored white chocolate are good alternatives.
- Crisco (2 tablespoons): Helps smooth and shine the coating, making dipping easier and chocolate snappier; swap with coconut oil if you prefer a natural butter aroma.
- Miniature Reese’s Cups (18–20): Fun festive toppers with peanut buttery warmth; use mini chocolate candy or red and green M&Ms for variety.
- Christmas sprinkles: Adds cheerful texture and color; nonpareils or edible glitter are great festive finishes.
- Licorice or red vine candy (2–3 sticks, cut into ½ inch pieces): Mimic ornament hooks wonderfully; candy canes broken into pieces or pretzel sticks also work well.
Before You Begin
Before diving in, make sure you have all your ingredients prepped and ready — this recipe flows best when everything’s within arm’s reach. I recommend softening your cream cheese about 30 minutes prior; it should be pliable but not melted, allowing it to blend perfectly with crushed Oreos. Line your cookie sheets with parchment paper to catch any drips and help the chocolate set cleanly. Since no baking is involved, there’s no oven temperature to worry about — just patience for chilling!What You’ll Need
Essential tools to make Christmas Oreo Truffle Decorations Recipe easy and enjoyable — plus optional upgrades if you love efficiency.
How to Make Christmas Oreo Truffle Decorations Recipe
- Prepare your work surface. Line a large cookie sheet with parchment paper. This will be your resting place for the truffles as they chill and dry. It keeps everything tidy and makes cleanup effortless.
- Mix the truffle dough. In a bowl, combine the finely crushed Oreo cookies with softened cream cheese and vanilla extract. Use a sturdy spoon or a mixer on low speed. You’ll want a smooth, uniform dough with a slightly sticky sheen — that silky texture means they’ll hold together perfectly once chilled.
- Scoop and shape. Using a 1-inch cookie scoop, portion out the dough. Roll each ball gently between your palms until perfectly round and smooth, about 1 to 1½-inches across. This size creates a rich, single-bite explosion of flavor.
- Chill the truffles. Arrange your truffle balls on the parchment-lined cookie sheet, spacing them out so they don’t stick together. Refrigerate for 1 hour to let them firm up nicely — this step makes the dipping stage much easier and prevents messy melting.
- Start melting your first coating color. Approximately 5 to 10 minutes before the truffles finish chilling, place your first color of melting wafers into a heatproof bowl. Set up a double boiler by simmering 3-4 inches of water in a pot and positioning the bowl above without the bottom touching water. Stir the wafers gently as they begin to soften.
- Add Crisco and finish melting. When the wafers are halfway melted but still a bit chunky, stir in 1 tablespoon of Crisco. This addition creates a silky smooth chocolate with a beautiful glossy finish. Continue stirring until fully melted — the chocolate should flow like velvet.
- Dip the truffles. Using two forks or special dipping tools, gently submerge each chilled truffle ball in the melted coating. Roll it around so the entire surface is evenly covered in that shiny layer. Let excess drip off before placing back on the parchment paper.
- Decorate your truffles. While the coating is still wet, press an upside-down miniature Reese’s Cup gently on top of each dipped truffle. Then sprinkle with Christmas sprinkles for festive texture and color. Dollop a tiny bit of melted chocolate on the Reese’s Cup, then insert a small piece of licorice or red vine candy vertically to imitate an ornament hook. This small detail adds charm and holiday spirit.
- Chill the first half. Finish decorating half the truffle batch and slide the baking sheet into the refrigerator to set for at least 20 minutes. Firm truffles will make the next steps easier.
- Melt the second color wafers. While the first half chills, repeat the melting process with the other color of wafers—green or red—so everything is ready to go without waiting.
- Dip and decorate the remaining truffles. Just like you did the first half, dip the rest of the truffle balls in the second coating, then decorate with the miniature Reese’s Cups, sprinkles, and licorice candy pieces to keep the festive theme consistent.
- Final chill and set. Return all decorated truffles to the refrigerator for an additional 20 minutes. This step seals your truffles with a crisp, glossy shell and allows flavors to meld before serving or packaging for gifts.
Pro-Level Pointers
If your truffle dough feels too soft to handle, pop it back in the fridge for 15 more minutes — it should be firm but still pliable. When dipping, make sure the melted wafers are warm but not hot, or the truffles can melt and lose shape. Also, stirring in Crisco perfectly smooths the wafers, helping your coating dry with a satisfying snap.
Creative Variations for Christmas Oreo Truffle Decorations Recipe
- Peppermint Twist: Add ½ teaspoon peppermint extract to the truffle dough and garnish with crushed candy canes instead of sprinkles.
- Nutty Surprise: Mix finely chopped toasted pecans or almonds into the dough for added crunch and warmth.
- White Chocolate Wonderland: Use white chocolate melting wafers instead of red or green for a snowy effect, then add silver edible pearls.
- Festive Fruit: Top with dried cranberry bits alongside sprinkles for a tart contrast that balances sweetness.
- Spiced Holiday: Stir in ½ teaspoon cinnamon or pumpkin pie spice to the base mix for a cozy warming note.
- Mini Ornaments Display: Pipe tiny royal icing bows or messages on the Reese’s Cups for personalized edible gift tags.
Storage, Freezing & Reheating
- Storage: Keep truffles refrigerated in an airtight container for up to 1 week. This maintains the creamy texture and crisp coating perfectly.
- Freezing: For longer storage, freeze truffles in a single layer on a parchment-lined tray, then transfer to airtight containers or bags. Freeze for up to 2 months.
- Thawing: To thaw, place frozen truffles in the fridge overnight. Avoid room temperature thawing to prevent condensation softening the chocolate shell.
- Reheating: These truffles are best served cold or at room temperature. If needed, allow them to rest at room temp for 10 minutes before serving to unlock full flavor and silkiness.
Christmas Oreo Truffle Decorations Recipe FAQs
- Can I use regular cream cheese straight from the fridge?
For best results, let your cream cheese soften to room temperature — it blends more smoothly and prevents lumps in the dough. - My melted wafers are clumpy; how can I fix that?
Try stirring in a tablespoon of Crisco or coconut oil halfway through melting. Also, make sure you gently melt over simmering water rather than direct heat. - Can I skip the Reese’s cups or use a different topping?
Absolutely! They add a sweet peanut butter touch but feel free to swap with mini chocolates, nuts, or simply more sprinkles. - How long do these truffles last at room temperature?
Due to the cream cheese content, it’s safest to keep them refrigerated and enjoy within a week. - Is there a way to make these vegan or dairy-free?
Yes! Use dairy-free cream cheese and vegan chocolate or candy melts. Check labels carefully to keep all ingredients plant-based.
The Heart of Christmas Oreo Truffle Decorations Recipe
There’s something truly special about crafting Christmas treats that feel as festive as they taste. The Christmas Oreo Truffle Decorations Recipe brings together creamy, chocolatey bliss with bright red and green touches that instantly spark joy. I love how it’s such a cozy, hands-on activity — like decorating your own little edible ornaments straight from the heart of your kitchen. As you roll the silky, slightly sticky Oreo and cream cheese mixture into smooth balls, you’ll notice how the texture hints at the luscious bite to come. Then dipping them in glossy, colorful melting wafers feels a bit like magic – watching the chocolate shimmer into a crisp-edged coat. This recipe really lets you blend delicious flavors with a sprinkle of holiday cheer, creating truffles that are perfect for gift-giving or gathering around the table with friends and family. I’m excited to share this step-by-step guide with you, so you’ll feel confident making these charming truffles in your own kitchen. Before we get started, here’s why this Christmas Oreo Truffle Decorations Recipe deserves a spot on your holiday must-make list.Why This Recipe Shines
- Flavor balance: Cozy, bright, and layered — never flat.
- Beginner tested: Clear steps with real-life timing cues.
- Customize-friendly: Works with pantry swaps and add-ins.
- Make ahead approved: Holds texture and flavor beautifully.
Ingredient Breakdown
- Oreo cookies (3 cups, finely crushed): The chocolatey backbone; substitute with any chocolate sandwich cookies or gluten-free versions for dietary needs.
- Cream cheese (8 oz, softened): Adds luscious silkiness and binds the mixture; you can try mascarpone for richer flavor or vegan cream cheese to keep it dairy-free.
- Vanilla extract (1 teaspoon): A subtle warm spice that rounds out flavors; almond or peppermint extract work beautifully for festive twists.
- Green and red melting wafers (1½ cups each): Provide vibrant, glossy coatings; candy melts or colored white chocolate are good alternatives.
- Crisco (2 tablespoons): Helps smooth and shine the coating, making dipping easier and chocolate snappier; swap with coconut oil if you prefer a natural butter aroma.
- Miniature Reese’s Cups (18–20): Fun festive toppers with peanut buttery warmth; use mini chocolate candy or red and green M&Ms for variety.
- Christmas sprinkles: Adds cheerful texture and color; nonpareils or edible glitter are great festive finishes.
- Licorice or red vine candy (2–3 sticks, cut into ½ inch pieces): Mimic ornament hooks wonderfully; candy canes broken into pieces or pretzel sticks also work well.
Before You Begin
Before diving in, make sure you have all your ingredients prepped and ready — this recipe flows best when everything’s within arm’s reach. I recommend softening your cream cheese about 30 minutes prior; it should be pliable but not melted, allowing it to blend perfectly with crushed Oreos. Line your cookie sheets with parchment paper to catch any drips and help the chocolate set cleanly. Since no baking is involved, there’s no oven temperature to worry about — just patience for chilling!What You’ll Need
Essential tools to make Christmas Oreo Truffle Decorations Recipe easy and enjoyable — plus optional upgrades if you love efficiency.
How to Make Christmas Oreo Truffle Decorations Recipe
- Prepare your work surface. Line a large cookie sheet with parchment paper. This will be your resting place for the truffles as they chill and dry. It keeps everything tidy and makes cleanup effortless.
- Mix the truffle dough. In a bowl, combine the finely crushed Oreo cookies with softened cream cheese and vanilla extract. Use a sturdy spoon or a mixer on low speed. You’ll want a smooth, uniform dough with a slightly sticky sheen — that silky texture means they’ll hold together perfectly once chilled.
- Scoop and shape. Using a 1-inch cookie scoop, portion out the dough. Roll each ball gently between your palms until perfectly round and smooth, about 1 to 1½-inches across. This size creates a rich, single-bite explosion of flavor.
- Chill the truffles. Arrange your truffle balls on the parchment-lined cookie sheet, spacing them out so they don’t stick together. Refrigerate for 1 hour to let them firm up nicely — this step makes the dipping stage much easier and prevents messy melting.
- Start melting your first coating color. Approximately 5 to 10 minutes before the truffles finish chilling, place your first color of melting wafers into a heatproof bowl. Set up a double boiler by simmering 3-4 inches of water in a pot and positioning the bowl above without the bottom touching water. Stir the wafers gently as they begin to soften.
- Add Crisco and finish melting. When the wafers are halfway melted but still a bit chunky, stir in 1 tablespoon of Crisco. This addition creates a silky smooth chocolate with a beautiful glossy finish. Continue stirring until fully melted — the chocolate should flow like velvet.
- Dip the truffles. Using two forks or special dipping tools, gently submerge each chilled truffle ball in the melted coating. Roll it around so the entire surface is evenly covered in that shiny layer. Let excess drip off before placing back on the parchment paper.
- Decorate your truffles. While the coating is still wet, press an upside-down miniature Reese’s Cup gently on top of each dipped truffle. Then sprinkle with Christmas sprinkles for festive texture and color. Dollop a tiny bit of melted chocolate on the Reese’s Cup, then insert a small piece of licorice or red vine candy vertically to imitate an ornament hook. This small detail adds charm and holiday spirit.
- Chill the first half. Finish decorating half the truffle batch and slide the baking sheet into the refrigerator to set for at least 20 minutes. Firm truffles will make the next steps easier.
- Melt the second color wafers. While the first half chills, repeat the melting process with the other color of wafers—green or red—so everything is ready to go without waiting.
- Dip and decorate the remaining truffles. Just like you did the first half, dip the rest of the truffle balls in the second coating, then decorate with the miniature Reese’s Cups, sprinkles, and licorice candy pieces to keep the festive theme consistent.
- Final chill and set. Return all decorated truffles to the refrigerator for an additional 20 minutes. This step seals your truffles with a crisp, glossy shell and allows flavors to meld before serving or packaging for gifts.
Pro-Level Pointers
If your truffle dough feels too soft to handle, pop it back in the fridge for 15 more minutes — it should be firm but still pliable. When dipping, make sure the melted wafers are warm but not hot, or the truffles can melt and lose shape. Also, stirring in Crisco perfectly smooths the wafers, helping your coating dry with a satisfying snap.
Creative Variations for Christmas Oreo Truffle Decorations Recipe
- Peppermint Twist: Add ½ teaspoon peppermint extract to the truffle dough and garnish with crushed candy canes instead of sprinkles.
- Nutty Surprise: Mix finely chopped toasted pecans or almonds into the dough for added crunch and warmth.
- White Chocolate Wonderland: Use white chocolate melting wafers instead of red or green for a snowy effect, then add silver edible pearls.
- Festive Fruit: Top with dried cranberry bits alongside sprinkles for a tart contrast that balances sweetness.
- Spiced Holiday: Stir in ½ teaspoon cinnamon or pumpkin pie spice to the base mix for a cozy warming note.
- Mini Ornaments Display: Pipe tiny royal icing bows or messages on the Reese’s Cups for personalized edible gift tags.
Storage, Freezing & Reheating
- Storage: Keep truffles refrigerated in an airtight container for up to 1 week. This maintains the creamy texture and crisp coating perfectly.
- Freezing: For longer storage, freeze truffles in a single layer on a parchment-lined tray, then transfer to airtight containers or bags. Freeze for up to 2 months.
- Thawing: To thaw, place frozen truffles in the fridge overnight. Avoid room temperature thawing to prevent condensation softening the chocolate shell.
- Reheating: These truffles are best served cold or at room temperature. If needed, allow them to rest at room temp for 10 minutes before serving to unlock full flavor and silkiness.
Christmas Oreo Truffle Decorations Recipe FAQs
- Can I use regular cream cheese straight from the fridge?
For best results, let your cream cheese soften to room temperature — it blends more smoothly and prevents lumps in the dough. - My melted wafers are clumpy; how can I fix that?
Try stirring in a tablespoon of Crisco or coconut oil halfway through melting. Also, make sure you gently melt over simmering water rather than direct heat. - Can I skip the Reese’s cups or use a different topping?
Absolutely! They add a sweet peanut butter touch but feel free to swap with mini chocolates, nuts, or simply more sprinkles. - How long do these truffles last at room temperature?
Due to the cream cheese content, it’s safest to keep them refrigerated and enjoy within a week. - Is there a way to make these vegan or dairy-free?
Yes! Use dairy-free cream cheese and vegan chocolate or candy melts. Check labels carefully to keep all ingredients plant-based.
Why This Recipe Shines
- Flavor balance: Cozy, bright, and layered — never flat.
- Beginner tested: Clear steps with real-life timing cues.
- Customize-friendly: Works with pantry swaps and add-ins.
- Make ahead approved: Holds texture and flavor beautifully.
Ingredient Breakdown
- Oreo cookies (3 cups, finely crushed): The chocolatey backbone; substitute with any chocolate sandwich cookies or gluten-free versions for dietary needs.
- Cream cheese (8 oz, softened): Adds luscious silkiness and binds the mixture; you can try mascarpone for richer flavor or vegan cream cheese to keep it dairy-free.
- Vanilla extract (1 teaspoon): A subtle warm spice that rounds out flavors; almond or peppermint extract work beautifully for festive twists.
- Green and red melting wafers (1½ cups each): Provide vibrant, glossy coatings; candy melts or colored white chocolate are good alternatives.
- Crisco (2 tablespoons): Helps smooth and shine the coating, making dipping easier and chocolate snappier; swap with coconut oil if you prefer a natural butter aroma.
- Miniature Reese’s Cups (18–20): Fun festive toppers with peanut buttery warmth; use mini chocolate candy or red and green M&Ms for variety.
- Christmas sprinkles: Adds cheerful texture and color; nonpareils or edible glitter are great festive finishes.
- Licorice or red vine candy (2–3 sticks, cut into ½ inch pieces): Mimic ornament hooks wonderfully; candy canes broken into pieces or pretzel sticks also work well.
Before You Begin
Before diving in, make sure you have all your ingredients prepped and ready — this recipe flows best when everything’s within arm’s reach. I recommend softening your cream cheese about 30 minutes prior; it should be pliable but not melted, allowing it to blend perfectly with crushed Oreos. Line your cookie sheets with parchment paper to catch any drips and help the chocolate set cleanly. Since no baking is involved, there’s no oven temperature to worry about — just patience for chilling!What You’ll Need
Essential tools to make Christmas Oreo Truffle Decorations Recipe easy and enjoyable — plus optional upgrades if you love efficiency.
How to Make Christmas Oreo Truffle Decorations Recipe
- Prepare your work surface. Line a large cookie sheet with parchment paper. This will be your resting place for the truffles as they chill and dry. It keeps everything tidy and makes cleanup effortless.
- Mix the truffle dough. In a bowl, combine the finely crushed Oreo cookies with softened cream cheese and vanilla extract. Use a sturdy spoon or a mixer on low speed. You’ll want a smooth, uniform dough with a slightly sticky sheen — that silky texture means they’ll hold together perfectly once chilled.
- Scoop and shape. Using a 1-inch cookie scoop, portion out the dough. Roll each ball gently between your palms until perfectly round and smooth, about 1 to 1½-inches across. This size creates a rich, single-bite explosion of flavor.
- Chill the truffles. Arrange your truffle balls on the parchment-lined cookie sheet, spacing them out so they don’t stick together. Refrigerate for 1 hour to let them firm up nicely — this step makes the dipping stage much easier and prevents messy melting.
- Start melting your first coating color. Approximately 5 to 10 minutes before the truffles finish chilling, place your first color of melting wafers into a heatproof bowl. Set up a double boiler by simmering 3-4 inches of water in a pot and positioning the bowl above without the bottom touching water. Stir the wafers gently as they begin to soften.
- Add Crisco and finish melting. When the wafers are halfway melted but still a bit chunky, stir in 1 tablespoon of Crisco. This addition creates a silky smooth chocolate with a beautiful glossy finish. Continue stirring until fully melted — the chocolate should flow like velvet.
- Dip the truffles. Using two forks or special dipping tools, gently submerge each chilled truffle ball in the melted coating. Roll it around so the entire surface is evenly covered in that shiny layer. Let excess drip off before placing back on the parchment paper.
- Decorate your truffles. While the coating is still wet, press an upside-down miniature Reese’s Cup gently on top of each dipped truffle. Then sprinkle with Christmas sprinkles for festive texture and color. Dollop a tiny bit of melted chocolate on the Reese’s Cup, then insert a small piece of licorice or red vine candy vertically to imitate an ornament hook. This small detail adds charm and holiday spirit.
- Chill the first half. Finish decorating half the truffle batch and slide the baking sheet into the refrigerator to set for at least 20 minutes. Firm truffles will make the next steps easier.
- Melt the second color wafers. While the first half chills, repeat the melting process with the other color of wafers—green or red—so everything is ready to go without waiting.
- Dip and decorate the remaining truffles. Just like you did the first half, dip the rest of the truffle balls in the second coating, then decorate with the miniature Reese’s Cups, sprinkles, and licorice candy pieces to keep the festive theme consistent.
- Final chill and set. Return all decorated truffles to the refrigerator for an additional 20 minutes. This step seals your truffles with a crisp, glossy shell and allows flavors to meld before serving or packaging for gifts.
Pro-Level Pointers
If your truffle dough feels too soft to handle, pop it back in the fridge for 15 more minutes — it should be firm but still pliable. When dipping, make sure the melted wafers are warm but not hot, or the truffles can melt and lose shape. Also, stirring in Crisco perfectly smooths the wafers, helping your coating dry with a satisfying snap.
Creative Variations for Christmas Oreo Truffle Decorations Recipe
- Peppermint Twist: Add ½ teaspoon peppermint extract to the truffle dough and garnish with crushed candy canes instead of sprinkles.
- Nutty Surprise: Mix finely chopped toasted pecans or almonds into the dough for added crunch and warmth.
- White Chocolate Wonderland: Use white chocolate melting wafers instead of red or green for a snowy effect, then add silver edible pearls.
- Festive Fruit: Top with dried cranberry bits alongside sprinkles for a tart contrast that balances sweetness.
- Spiced Holiday: Stir in ½ teaspoon cinnamon or pumpkin pie spice to the base mix for a cozy warming note.
- Mini Ornaments Display: Pipe tiny royal icing bows or messages on the Reese’s Cups for personalized edible gift tags.
Storage, Freezing & Reheating
- Storage: Keep truffles refrigerated in an airtight container for up to 1 week. This maintains the creamy texture and crisp coating perfectly.
- Freezing: For longer storage, freeze truffles in a single layer on a parchment-lined tray, then transfer to airtight containers or bags. Freeze for up to 2 months.
- Thawing: To thaw, place frozen truffles in the fridge overnight. Avoid room temperature thawing to prevent condensation softening the chocolate shell.
- Reheating: These truffles are best served cold or at room temperature. If needed, allow them to rest at room temp for 10 minutes before serving to unlock full flavor and silkiness.
Christmas Oreo Truffle Decorations Recipe FAQs
- Can I use regular cream cheese straight from the fridge?
For best results, let your cream cheese soften to room temperature — it blends more smoothly and prevents lumps in the dough. - My melted wafers are clumpy; how can I fix that?
Try stirring in a tablespoon of Crisco or coconut oil halfway through melting. Also, make sure you gently melt over simmering water rather than direct heat. - Can I skip the Reese’s cups or use a different topping?
Absolutely! They add a sweet peanut butter touch but feel free to swap with mini chocolates, nuts, or simply more sprinkles. - How long do these truffles last at room temperature?
Due to the cream cheese content, it’s safest to keep them refrigerated and enjoy within a week. - Is there a way to make these vegan or dairy-free?
Yes! Use dairy-free cream cheese and vegan chocolate or candy melts. Check labels carefully to keep all ingredients plant-based.
The Heart of Christmas Oreo Truffle Decorations Recipe
There’s something truly special about crafting Christmas treats that feel as festive as they taste. The Christmas Oreo Truffle Decorations Recipe brings together creamy, chocolatey bliss with bright red and green touches that instantly spark joy. I love how it’s such a cozy, hands-on activity — like decorating your own little edible ornaments straight from the heart of your kitchen. As you roll the silky, slightly sticky Oreo and cream cheese mixture into smooth balls, you’ll notice how the texture hints at the luscious bite to come. Then dipping them in glossy, colorful melting wafers feels a bit like magic – watching the chocolate shimmer into a crisp-edged coat. This recipe really lets you blend delicious flavors with a sprinkle of holiday cheer, creating truffles that are perfect for gift-giving or gathering around the table with friends and family. I’m excited to share this step-by-step guide with you, so you’ll feel confident making these charming truffles in your own kitchen. Before we get started, here’s why this Christmas Oreo Truffle Decorations Recipe deserves a spot on your holiday must-make list.Why This Recipe Shines
- Flavor balance: Cozy, bright, and layered — never flat.
- Beginner tested: Clear steps with real-life timing cues.
- Customize-friendly: Works with pantry swaps and add-ins.
- Make ahead approved: Holds texture and flavor beautifully.
Ingredient Breakdown
- Oreo cookies (3 cups, finely crushed): The chocolatey backbone; substitute with any chocolate sandwich cookies or gluten-free versions for dietary needs.
- Cream cheese (8 oz, softened): Adds luscious silkiness and binds the mixture; you can try mascarpone for richer flavor or vegan cream cheese to keep it dairy-free.
- Vanilla extract (1 teaspoon): A subtle warm spice that rounds out flavors; almond or peppermint extract work beautifully for festive twists.
- Green and red melting wafers (1½ cups each): Provide vibrant, glossy coatings; candy melts or colored white chocolate are good alternatives.
- Crisco (2 tablespoons): Helps smooth and shine the coating, making dipping easier and chocolate snappier; swap with coconut oil if you prefer a natural butter aroma.
- Miniature Reese’s Cups (18–20): Fun festive toppers with peanut buttery warmth; use mini chocolate candy or red and green M&Ms for variety.
- Christmas sprinkles: Adds cheerful texture and color; nonpareils or edible glitter are great festive finishes.
- Licorice or red vine candy (2–3 sticks, cut into ½ inch pieces): Mimic ornament hooks wonderfully; candy canes broken into pieces or pretzel sticks also work well.
Before You Begin
Before diving in, make sure you have all your ingredients prepped and ready — this recipe flows best when everything’s within arm’s reach. I recommend softening your cream cheese about 30 minutes prior; it should be pliable but not melted, allowing it to blend perfectly with crushed Oreos. Line your cookie sheets with parchment paper to catch any drips and help the chocolate set cleanly. Since no baking is involved, there’s no oven temperature to worry about — just patience for chilling!What You’ll Need
Essential tools to make Christmas Oreo Truffle Decorations Recipe easy and enjoyable — plus optional upgrades if you love efficiency.
How to Make Christmas Oreo Truffle Decorations Recipe
- Prepare your work surface. Line a large cookie sheet with parchment paper. This will be your resting place for the truffles as they chill and dry. It keeps everything tidy and makes cleanup effortless.
- Mix the truffle dough. In a bowl, combine the finely crushed Oreo cookies with softened cream cheese and vanilla extract. Use a sturdy spoon or a mixer on low speed. You’ll want a smooth, uniform dough with a slightly sticky sheen — that silky texture means they’ll hold together perfectly once chilled.
- Scoop and shape. Using a 1-inch cookie scoop, portion out the dough. Roll each ball gently between your palms until perfectly round and smooth, about 1 to 1½-inches across. This size creates a rich, single-bite explosion of flavor.
- Chill the truffles. Arrange your truffle balls on the parchment-lined cookie sheet, spacing them out so they don’t stick together. Refrigerate for 1 hour to let them firm up nicely — this step makes the dipping stage much easier and prevents messy melting.
- Start melting your first coating color. Approximately 5 to 10 minutes before the truffles finish chilling, place your first color of melting wafers into a heatproof bowl. Set up a double boiler by simmering 3-4 inches of water in a pot and positioning the bowl above without the bottom touching water. Stir the wafers gently as they begin to soften.
- Add Crisco and finish melting. When the wafers are halfway melted but still a bit chunky, stir in 1 tablespoon of Crisco. This addition creates a silky smooth chocolate with a beautiful glossy finish. Continue stirring until fully melted — the chocolate should flow like velvet.
- Dip the truffles. Using two forks or special dipping tools, gently submerge each chilled truffle ball in the melted coating. Roll it around so the entire surface is evenly covered in that shiny layer. Let excess drip off before placing back on the parchment paper.
- Decorate your truffles. While the coating is still wet, press an upside-down miniature Reese’s Cup gently on top of each dipped truffle. Then sprinkle with Christmas sprinkles for festive texture and color. Dollop a tiny bit of melted chocolate on the Reese’s Cup, then insert a small piece of licorice or red vine candy vertically to imitate an ornament hook. This small detail adds charm and holiday spirit.
- Chill the first half. Finish decorating half the truffle batch and slide the baking sheet into the refrigerator to set for at least 20 minutes. Firm truffles will make the next steps easier.
- Melt the second color wafers. While the first half chills, repeat the melting process with the other color of wafers—green or red—so everything is ready to go without waiting.
- Dip and decorate the remaining truffles. Just like you did the first half, dip the rest of the truffle balls in the second coating, then decorate with the miniature Reese’s Cups, sprinkles, and licorice candy pieces to keep the festive theme consistent.
- Final chill and set. Return all decorated truffles to the refrigerator for an additional 20 minutes. This step seals your truffles with a crisp, glossy shell and allows flavors to meld before serving or packaging for gifts.
Pro-Level Pointers
If your truffle dough feels too soft to handle, pop it back in the fridge for 15 more minutes — it should be firm but still pliable. When dipping, make sure the melted wafers are warm but not hot, or the truffles can melt and lose shape. Also, stirring in Crisco perfectly smooths the wafers, helping your coating dry with a satisfying snap.
Creative Variations for Christmas Oreo Truffle Decorations Recipe
- Peppermint Twist: Add ½ teaspoon peppermint extract to the truffle dough and garnish with crushed candy canes instead of sprinkles.
- Nutty Surprise: Mix finely chopped toasted pecans or almonds into the dough for added crunch and warmth.
- White Chocolate Wonderland: Use white chocolate melting wafers instead of red or green for a snowy effect, then add silver edible pearls.
- Festive Fruit: Top with dried cranberry bits alongside sprinkles for a tart contrast that balances sweetness.
- Spiced Holiday: Stir in ½ teaspoon cinnamon or pumpkin pie spice to the base mix for a cozy warming note.
- Mini Ornaments Display: Pipe tiny royal icing bows or messages on the Reese’s Cups for personalized edible gift tags.
Storage, Freezing & Reheating
- Storage: Keep truffles refrigerated in an airtight container for up to 1 week. This maintains the creamy texture and crisp coating perfectly.
- Freezing: For longer storage, freeze truffles in a single layer on a parchment-lined tray, then transfer to airtight containers or bags. Freeze for up to 2 months.
- Thawing: To thaw, place frozen truffles in the fridge overnight. Avoid room temperature thawing to prevent condensation softening the chocolate shell.
- Reheating: These truffles are best served cold or at room temperature. If needed, allow them to rest at room temp for 10 minutes before serving to unlock full flavor and silkiness.
Christmas Oreo Truffle Decorations Recipe FAQs
- Can I use regular cream cheese straight from the fridge?
For best results, let your cream cheese soften to room temperature — it blends more smoothly and prevents lumps in the dough. - My melted wafers are clumpy; how can I fix that?
Try stirring in a tablespoon of Crisco or coconut oil halfway through melting. Also, make sure you gently melt over simmering water rather than direct heat. - Can I skip the Reese’s cups or use a different topping?
Absolutely! They add a sweet peanut butter touch but feel free to swap with mini chocolates, nuts, or simply more sprinkles. - How long do these truffles last at room temperature?
Due to the cream cheese content, it’s safest to keep them refrigerated and enjoy within a week. - Is there a way to make these vegan or dairy-free?
Yes! Use dairy-free cream cheese and vegan chocolate or candy melts. Check labels carefully to keep all ingredients plant-based.
Why This Recipe Shines
- Flavor balance: Cozy, bright, and layered — never flat.
- Beginner tested: Clear steps with real-life timing cues.
- Customize-friendly: Works with pantry swaps and add-ins.
- Make ahead approved: Holds texture and flavor beautifully.
Ingredient Breakdown
- Oreo cookies (3 cups, finely crushed): The chocolatey backbone; substitute with any chocolate sandwich cookies or gluten-free versions for dietary needs.
- Cream cheese (8 oz, softened): Adds luscious silkiness and binds the mixture; you can try mascarpone for richer flavor or vegan cream cheese to keep it dairy-free.
- Vanilla extract (1 teaspoon): A subtle warm spice that rounds out flavors; almond or peppermint extract work beautifully for festive twists.
- Green and red melting wafers (1½ cups each): Provide vibrant, glossy coatings; candy melts or colored white chocolate are good alternatives.
- Crisco (2 tablespoons): Helps smooth and shine the coating, making dipping easier and chocolate snappier; swap with coconut oil if you prefer a natural butter aroma.
- Miniature Reese’s Cups (18–20): Fun festive toppers with peanut buttery warmth; use mini chocolate candy or red and green M&Ms for variety.
- Christmas sprinkles: Adds cheerful texture and color; nonpareils or edible glitter are great festive finishes.
- Licorice or red vine candy (2–3 sticks, cut into ½ inch pieces): Mimic ornament hooks wonderfully; candy canes broken into pieces or pretzel sticks also work well.
Before You Begin
Before diving in, make sure you have all your ingredients prepped and ready — this recipe flows best when everything’s within arm’s reach. I recommend softening your cream cheese about 30 minutes prior; it should be pliable but not melted, allowing it to blend perfectly with crushed Oreos. Line your cookie sheets with parchment paper to catch any drips and help the chocolate set cleanly. Since no baking is involved, there’s no oven temperature to worry about — just patience for chilling!What You’ll Need
Essential tools to make Christmas Oreo Truffle Decorations Recipe easy and enjoyable — plus optional upgrades if you love efficiency.
How to Make Christmas Oreo Truffle Decorations Recipe
- Prepare your work surface. Line a large cookie sheet with parchment paper. This will be your resting place for the truffles as they chill and dry. It keeps everything tidy and makes cleanup effortless.
- Mix the truffle dough. In a bowl, combine the finely crushed Oreo cookies with softened cream cheese and vanilla extract. Use a sturdy spoon or a mixer on low speed. You’ll want a smooth, uniform dough with a slightly sticky sheen — that silky texture means they’ll hold together perfectly once chilled.
- Scoop and shape. Using a 1-inch cookie scoop, portion out the dough. Roll each ball gently between your palms until perfectly round and smooth, about 1 to 1½-inches across. This size creates a rich, single-bite explosion of flavor.
- Chill the truffles. Arrange your truffle balls on the parchment-lined cookie sheet, spacing them out so they don’t stick together. Refrigerate for 1 hour to let them firm up nicely — this step makes the dipping stage much easier and prevents messy melting.
- Start melting your first coating color. Approximately 5 to 10 minutes before the truffles finish chilling, place your first color of melting wafers into a heatproof bowl. Set up a double boiler by simmering 3-4 inches of water in a pot and positioning the bowl above without the bottom touching water. Stir the wafers gently as they begin to soften.
- Add Crisco and finish melting. When the wafers are halfway melted but still a bit chunky, stir in 1 tablespoon of Crisco. This addition creates a silky smooth chocolate with a beautiful glossy finish. Continue stirring until fully melted — the chocolate should flow like velvet.
- Dip the truffles. Using two forks or special dipping tools, gently submerge each chilled truffle ball in the melted coating. Roll it around so the entire surface is evenly covered in that shiny layer. Let excess drip off before placing back on the parchment paper.
- Decorate your truffles. While the coating is still wet, press an upside-down miniature Reese’s Cup gently on top of each dipped truffle. Then sprinkle with Christmas sprinkles for festive texture and color. Dollop a tiny bit of melted chocolate on the Reese’s Cup, then insert a small piece of licorice or red vine candy vertically to imitate an ornament hook. This small detail adds charm and holiday spirit.
- Chill the first half. Finish decorating half the truffle batch and slide the baking sheet into the refrigerator to set for at least 20 minutes. Firm truffles will make the next steps easier.
- Melt the second color wafers. While the first half chills, repeat the melting process with the other color of wafers—green or red—so everything is ready to go without waiting.
- Dip and decorate the remaining truffles. Just like you did the first half, dip the rest of the truffle balls in the second coating, then decorate with the miniature Reese’s Cups, sprinkles, and licorice candy pieces to keep the festive theme consistent.
- Final chill and set. Return all decorated truffles to the refrigerator for an additional 20 minutes. This step seals your truffles with a crisp, glossy shell and allows flavors to meld before serving or packaging for gifts.
Pro-Level Pointers
If your truffle dough feels too soft to handle, pop it back in the fridge for 15 more minutes — it should be firm but still pliable. When dipping, make sure the melted wafers are warm but not hot, or the truffles can melt and lose shape. Also, stirring in Crisco perfectly smooths the wafers, helping your coating dry with a satisfying snap.
Creative Variations for Christmas Oreo Truffle Decorations Recipe
- Peppermint Twist: Add ½ teaspoon peppermint extract to the truffle dough and garnish with crushed candy canes instead of sprinkles.
- Nutty Surprise: Mix finely chopped toasted pecans or almonds into the dough for added crunch and warmth.
- White Chocolate Wonderland: Use white chocolate melting wafers instead of red or green for a snowy effect, then add silver edible pearls.
- Festive Fruit: Top with dried cranberry bits alongside sprinkles for a tart contrast that balances sweetness.
- Spiced Holiday: Stir in ½ teaspoon cinnamon or pumpkin pie spice to the base mix for a cozy warming note.
- Mini Ornaments Display: Pipe tiny royal icing bows or messages on the Reese’s Cups for personalized edible gift tags.
Storage, Freezing & Reheating
- Storage: Keep truffles refrigerated in an airtight container for up to 1 week. This maintains the creamy texture and crisp coating perfectly.
- Freezing: For longer storage, freeze truffles in a single layer on a parchment-lined tray, then transfer to airtight containers or bags. Freeze for up to 2 months.
- Thawing: To thaw, place frozen truffles in the fridge overnight. Avoid room temperature thawing to prevent condensation softening the chocolate shell.
- Reheating: These truffles are best served cold or at room temperature. If needed, allow them to rest at room temp for 10 minutes before serving to unlock full flavor and silkiness.
Christmas Oreo Truffle Decorations Recipe FAQs
- Can I use regular cream cheese straight from the fridge?
For best results, let your cream cheese soften to room temperature — it blends more smoothly and prevents lumps in the dough. - My melted wafers are clumpy; how can I fix that?
Try stirring in a tablespoon of Crisco or coconut oil halfway through melting. Also, make sure you gently melt over simmering water rather than direct heat. - Can I skip the Reese’s cups or use a different topping?
Absolutely! They add a sweet peanut butter touch but feel free to swap with mini chocolates, nuts, or simply more sprinkles. - How long do these truffles last at room temperature?
Due to the cream cheese content, it’s safest to keep them refrigerated and enjoy within a week. - Is there a way to make these vegan or dairy-free?
Yes! Use dairy-free cream cheese and vegan chocolate or candy melts. Check labels carefully to keep all ingredients plant-based.
The Heart of Christmas Oreo Truffle Decorations Recipe
There’s something truly special about crafting Christmas treats that feel as festive as they taste. The Christmas Oreo Truffle Decorations Recipe brings together creamy, chocolatey bliss with bright red and green touches that instantly spark joy. I love how it’s such a cozy, hands-on activity — like decorating your own little edible ornaments straight from the heart of your kitchen. As you roll the silky, slightly sticky Oreo and cream cheese mixture into smooth balls, you’ll notice how the texture hints at the luscious bite to come. Then dipping them in glossy, colorful melting wafers feels a bit like magic – watching the chocolate shimmer into a crisp-edged coat. This recipe really lets you blend delicious flavors with a sprinkle of holiday cheer, creating truffles that are perfect for gift-giving or gathering around the table with friends and family. I’m excited to share this step-by-step guide with you, so you’ll feel confident making these charming truffles in your own kitchen. Before we get started, here’s why this Christmas Oreo Truffle Decorations Recipe deserves a spot on your holiday must-make list.Why This Recipe Shines
- Flavor balance: Cozy, bright, and layered — never flat.
- Beginner tested: Clear steps with real-life timing cues.
- Customize-friendly: Works with pantry swaps and add-ins.
- Make ahead approved: Holds texture and flavor beautifully.
Ingredient Breakdown
- Oreo cookies (3 cups, finely crushed): The chocolatey backbone; substitute with any chocolate sandwich cookies or gluten-free versions for dietary needs.
- Cream cheese (8 oz, softened): Adds luscious silkiness and binds the mixture; you can try mascarpone for richer flavor or vegan cream cheese to keep it dairy-free.
- Vanilla extract (1 teaspoon): A subtle warm spice that rounds out flavors; almond or peppermint extract work beautifully for festive twists.
- Green and red melting wafers (1½ cups each): Provide vibrant, glossy coatings; candy melts or colored white chocolate are good alternatives.
- Crisco (2 tablespoons): Helps smooth and shine the coating, making dipping easier and chocolate snappier; swap with coconut oil if you prefer a natural butter aroma.
- Miniature Reese’s Cups (18–20): Fun festive toppers with peanut buttery warmth; use mini chocolate candy or red and green M&Ms for variety.
- Christmas sprinkles: Adds cheerful texture and color; nonpareils or edible glitter are great festive finishes.
- Licorice or red vine candy (2–3 sticks, cut into ½ inch pieces): Mimic ornament hooks wonderfully; candy canes broken into pieces or pretzel sticks also work well.
Before You Begin
Before diving in, make sure you have all your ingredients prepped and ready — this recipe flows best when everything’s within arm’s reach. I recommend softening your cream cheese about 30 minutes prior; it should be pliable but not melted, allowing it to blend perfectly with crushed Oreos. Line your cookie sheets with parchment paper to catch any drips and help the chocolate set cleanly. Since no baking is involved, there’s no oven temperature to worry about — just patience for chilling!What You’ll Need
Essential tools to make Christmas Oreo Truffle Decorations Recipe easy and enjoyable — plus optional upgrades if you love efficiency.
How to Make Christmas Oreo Truffle Decorations Recipe
- Prepare your work surface. Line a large cookie sheet with parchment paper. This will be your resting place for the truffles as they chill and dry. It keeps everything tidy and makes cleanup effortless.
- Mix the truffle dough. In a bowl, combine the finely crushed Oreo cookies with softened cream cheese and vanilla extract. Use a sturdy spoon or a mixer on low speed. You’ll want a smooth, uniform dough with a slightly sticky sheen — that silky texture means they’ll hold together perfectly once chilled.
- Scoop and shape. Using a 1-inch cookie scoop, portion out the dough. Roll each ball gently between your palms until perfectly round and smooth, about 1 to 1½-inches across. This size creates a rich, single-bite explosion of flavor.
- Chill the truffles. Arrange your truffle balls on the parchment-lined cookie sheet, spacing them out so they don’t stick together. Refrigerate for 1 hour to let them firm up nicely — this step makes the dipping stage much easier and prevents messy melting.
- Start melting your first coating color. Approximately 5 to 10 minutes before the truffles finish chilling, place your first color of melting wafers into a heatproof bowl. Set up a double boiler by simmering 3-4 inches of water in a pot and positioning the bowl above without the bottom touching water. Stir the wafers gently as they begin to soften.
- Add Crisco and finish melting. When the wafers are halfway melted but still a bit chunky, stir in 1 tablespoon of Crisco. This addition creates a silky smooth chocolate with a beautiful glossy finish. Continue stirring until fully melted — the chocolate should flow like velvet.
- Dip the truffles. Using two forks or special dipping tools, gently submerge each chilled truffle ball in the melted coating. Roll it around so the entire surface is evenly covered in that shiny layer. Let excess drip off before placing back on the parchment paper.
- Decorate your truffles. While the coating is still wet, press an upside-down miniature Reese’s Cup gently on top of each dipped truffle. Then sprinkle with Christmas sprinkles for festive texture and color. Dollop a tiny bit of melted chocolate on the Reese’s Cup, then insert a small piece of licorice or red vine candy vertically to imitate an ornament hook. This small detail adds charm and holiday spirit.
- Chill the first half. Finish decorating half the truffle batch and slide the baking sheet into the refrigerator to set for at least 20 minutes. Firm truffles will make the next steps easier.
- Melt the second color wafers. While the first half chills, repeat the melting process with the other color of wafers—green or red—so everything is ready to go without waiting.
- Dip and decorate the remaining truffles. Just like you did the first half, dip the rest of the truffle balls in the second coating, then decorate with the miniature Reese’s Cups, sprinkles, and licorice candy pieces to keep the festive theme consistent.
- Final chill and set. Return all decorated truffles to the refrigerator for an additional 20 minutes. This step seals your truffles with a crisp, glossy shell and allows flavors to meld before serving or packaging for gifts.
Pro-Level Pointers
If your truffle dough feels too soft to handle, pop it back in the fridge for 15 more minutes — it should be firm but still pliable. When dipping, make sure the melted wafers are warm but not hot, or the truffles can melt and lose shape. Also, stirring in Crisco perfectly smooths the wafers, helping your coating dry with a satisfying snap.
Creative Variations for Christmas Oreo Truffle Decorations Recipe
- Peppermint Twist: Add ½ teaspoon peppermint extract to the truffle dough and garnish with crushed candy canes instead of sprinkles.
- Nutty Surprise: Mix finely chopped toasted pecans or almonds into the dough for added crunch and warmth.
- White Chocolate Wonderland: Use white chocolate melting wafers instead of red or green for a snowy effect, then add silver edible pearls.
- Festive Fruit: Top with dried cranberry bits alongside sprinkles for a tart contrast that balances sweetness.
- Spiced Holiday: Stir in ½ teaspoon cinnamon or pumpkin pie spice to the base mix for a cozy warming note.
- Mini Ornaments Display: Pipe tiny royal icing bows or messages on the Reese’s Cups for personalized edible gift tags.
Storage, Freezing & Reheating
- Storage: Keep truffles refrigerated in an airtight container for up to 1 week. This maintains the creamy texture and crisp coating perfectly.
- Freezing: For longer storage, freeze truffles in a single layer on a parchment-lined tray, then transfer to airtight containers or bags. Freeze for up to 2 months.
- Thawing: To thaw, place frozen truffles in the fridge overnight. Avoid room temperature thawing to prevent condensation softening the chocolate shell.
- Reheating: These truffles are best served cold or at room temperature. If needed, allow them to rest at room temp for 10 minutes before serving to unlock full flavor and silkiness.
Christmas Oreo Truffle Decorations Recipe FAQs
- Can I use regular cream cheese straight from the fridge?
For best results, let your cream cheese soften to room temperature — it blends more smoothly and prevents lumps in the dough. - My melted wafers are clumpy; how can I fix that?
Try stirring in a tablespoon of Crisco or coconut oil halfway through melting. Also, make sure you gently melt over simmering water rather than direct heat. - Can I skip the Reese’s cups or use a different topping?
Absolutely! They add a sweet peanut butter touch but feel free to swap with mini chocolates, nuts, or simply more sprinkles. - How long do these truffles last at room temperature?
Due to the cream cheese content, it’s safest to keep them refrigerated and enjoy within a week. - Is there a way to make these vegan or dairy-free?
Yes! Use dairy-free cream cheese and vegan chocolate or candy melts. Check labels carefully to keep all ingredients plant-based.
Why This Recipe Shines
- Flavor balance: Cozy, bright, and layered — never flat.
- Beginner tested: Clear steps with real-life timing cues.
- Customize-friendly: Works with pantry swaps and add-ins.
- Make ahead approved: Holds texture and flavor beautifully.
Ingredient Breakdown
- Oreo cookies (3 cups, finely crushed): The chocolatey backbone; substitute with any chocolate sandwich cookies or gluten-free versions for dietary needs.
- Cream cheese (8 oz, softened): Adds luscious silkiness and binds the mixture; you can try mascarpone for richer flavor or vegan cream cheese to keep it dairy-free.
- Vanilla extract (1 teaspoon): A subtle warm spice that rounds out flavors; almond or peppermint extract work beautifully for festive twists.
- Green and red melting wafers (1½ cups each): Provide vibrant, glossy coatings; candy melts or colored white chocolate are good alternatives.
- Crisco (2 tablespoons): Helps smooth and shine the coating, making dipping easier and chocolate snappier; swap with coconut oil if you prefer a natural butter aroma.
- Miniature Reese’s Cups (18–20): Fun festive toppers with peanut buttery warmth; use mini chocolate candy or red and green M&Ms for variety.
- Christmas sprinkles: Adds cheerful texture and color; nonpareils or edible glitter are great festive finishes.
- Licorice or red vine candy (2–3 sticks, cut into ½ inch pieces): Mimic ornament hooks wonderfully; candy canes broken into pieces or pretzel sticks also work well.
Before You Begin
Before diving in, make sure you have all your ingredients prepped and ready — this recipe flows best when everything’s within arm’s reach. I recommend softening your cream cheese about 30 minutes prior; it should be pliable but not melted, allowing it to blend perfectly with crushed Oreos. Line your cookie sheets with parchment paper to catch any drips and help the chocolate set cleanly. Since no baking is involved, there’s no oven temperature to worry about — just patience for chilling!What You’ll Need
Essential tools to make Christmas Oreo Truffle Decorations Recipe easy and enjoyable — plus optional upgrades if you love efficiency.
How to Make Christmas Oreo Truffle Decorations Recipe
- Prepare your work surface. Line a large cookie sheet with parchment paper. This will be your resting place for the truffles as they chill and dry. It keeps everything tidy and makes cleanup effortless.
- Mix the truffle dough. In a bowl, combine the finely crushed Oreo cookies with softened cream cheese and vanilla extract. Use a sturdy spoon or a mixer on low speed. You’ll want a smooth, uniform dough with a slightly sticky sheen — that silky texture means they’ll hold together perfectly once chilled.
- Scoop and shape. Using a 1-inch cookie scoop, portion out the dough. Roll each ball gently between your palms until perfectly round and smooth, about 1 to 1½-inches across. This size creates a rich, single-bite explosion of flavor.
- Chill the truffles. Arrange your truffle balls on the parchment-lined cookie sheet, spacing them out so they don’t stick together. Refrigerate for 1 hour to let them firm up nicely — this step makes the dipping stage much easier and prevents messy melting.
- Start melting your first coating color. Approximately 5 to 10 minutes before the truffles finish chilling, place your first color of melting wafers into a heatproof bowl. Set up a double boiler by simmering 3-4 inches of water in a pot and positioning the bowl above without the bottom touching water. Stir the wafers gently as they begin to soften.
- Add Crisco and finish melting. When the wafers are halfway melted but still a bit chunky, stir in 1 tablespoon of Crisco. This addition creates a silky smooth chocolate with a beautiful glossy finish. Continue stirring until fully melted — the chocolate should flow like velvet.
- Dip the truffles. Using two forks or special dipping tools, gently submerge each chilled truffle ball in the melted coating. Roll it around so the entire surface is evenly covered in that shiny layer. Let excess drip off before placing back on the parchment paper.
- Decorate your truffles. While the coating is still wet, press an upside-down miniature Reese’s Cup gently on top of each dipped truffle. Then sprinkle with Christmas sprinkles for festive texture and color. Dollop a tiny bit of melted chocolate on the Reese’s Cup, then insert a small piece of licorice or red vine candy vertically to imitate an ornament hook. This small detail adds charm and holiday spirit.
- Chill the first half. Finish decorating half the truffle batch and slide the baking sheet into the refrigerator to set for at least 20 minutes. Firm truffles will make the next steps easier.
- Melt the second color wafers. While the first half chills, repeat the melting process with the other color of wafers—green or red—so everything is ready to go without waiting.
- Dip and decorate the remaining truffles. Just like you did the first half, dip the rest of the truffle balls in the second coating, then decorate with the miniature Reese’s Cups, sprinkles, and licorice candy pieces to keep the festive theme consistent.
- Final chill and set. Return all decorated truffles to the refrigerator for an additional 20 minutes. This step seals your truffles with a crisp, glossy shell and allows flavors to meld before serving or packaging for gifts.
Pro-Level Pointers
If your truffle dough feels too soft to handle, pop it back in the fridge for 15 more minutes — it should be firm but still pliable. When dipping, make sure the melted wafers are warm but not hot, or the truffles can melt and lose shape. Also, stirring in Crisco perfectly smooths the wafers, helping your coating dry with a satisfying snap.
Creative Variations for Christmas Oreo Truffle Decorations Recipe
- Peppermint Twist: Add ½ teaspoon peppermint extract to the truffle dough and garnish with crushed candy canes instead of sprinkles.
- Nutty Surprise: Mix finely chopped toasted pecans or almonds into the dough for added crunch and warmth.
- White Chocolate Wonderland: Use white chocolate melting wafers instead of red or green for a snowy effect, then add silver edible pearls.
- Festive Fruit: Top with dried cranberry bits alongside sprinkles for a tart contrast that balances sweetness.
- Spiced Holiday: Stir in ½ teaspoon cinnamon or pumpkin pie spice to the base mix for a cozy warming note.
- Mini Ornaments Display: Pipe tiny royal icing bows or messages on the Reese’s Cups for personalized edible gift tags.
Storage, Freezing & Reheating
- Storage: Keep truffles refrigerated in an airtight container for up to 1 week. This maintains the creamy texture and crisp coating perfectly.
- Freezing: For longer storage, freeze truffles in a single layer on a parchment-lined tray, then transfer to airtight containers or bags. Freeze for up to 2 months.
- Thawing: To thaw, place frozen truffles in the fridge overnight. Avoid room temperature thawing to prevent condensation softening the chocolate shell.
- Reheating: These truffles are best served cold or at room temperature. If needed, allow them to rest at room temp for 10 minutes before serving to unlock full flavor and silkiness.
Christmas Oreo Truffle Decorations Recipe FAQs
- Can I use regular cream cheese straight from the fridge?
For best results, let your cream cheese soften to room temperature — it blends more smoothly and prevents lumps in the dough. - My melted wafers are clumpy; how can I fix that?
Try stirring in a tablespoon of Crisco or coconut oil halfway through melting. Also, make sure you gently melt over simmering water rather than direct heat. - Can I skip the Reese’s cups or use a different topping?
Absolutely! They add a sweet peanut butter touch but feel free to swap with mini chocolates, nuts, or simply more sprinkles. - How long do these truffles last at room temperature?
Due to the cream cheese content, it’s safest to keep them refrigerated and enjoy within a week. - Is there a way to make these vegan or dairy-free?
Yes! Use dairy-free cream cheese and vegan chocolate or candy melts. Check labels carefully to keep all ingredients plant-based.
The Heart of Christmas Oreo Truffle Decorations Recipe
There’s something truly special about crafting Christmas treats that feel as festive as they taste. The Christmas Oreo Truffle Decorations Recipe brings together creamy, chocolatey bliss with bright red and green touches that instantly spark joy. I love how it’s such a cozy, hands-on activity — like decorating your own little edible ornaments straight from the heart of your kitchen. As you roll the silky, slightly sticky Oreo and cream cheese mixture into smooth balls, you’ll notice how the texture hints at the luscious bite to come. Then dipping them in glossy, colorful melting wafers feels a bit like magic – watching the chocolate shimmer into a crisp-edged coat. This recipe really lets you blend delicious flavors with a sprinkle of holiday cheer, creating truffles that are perfect for gift-giving or gathering around the table with friends and family. I’m excited to share this step-by-step guide with you, so you’ll feel confident making these charming truffles in your own kitchen. Before we get started, here’s why this Christmas Oreo Truffle Decorations Recipe deserves a spot on your holiday must-make list.Why This Recipe Shines
- Flavor balance: Cozy, bright, and layered — never flat.
- Beginner tested: Clear steps with real-life timing cues.
- Customize-friendly: Works with pantry swaps and add-ins.
- Make ahead approved: Holds texture and flavor beautifully.
Ingredient Breakdown
- Oreo cookies (3 cups, finely crushed): The chocolatey backbone; substitute with any chocolate sandwich cookies or gluten-free versions for dietary needs.
- Cream cheese (8 oz, softened): Adds luscious silkiness and binds the mixture; you can try mascarpone for richer flavor or vegan cream cheese to keep it dairy-free.
- Vanilla extract (1 teaspoon): A subtle warm spice that rounds out flavors; almond or peppermint extract work beautifully for festive twists.
- Green and red melting wafers (1½ cups each): Provide vibrant, glossy coatings; candy melts or colored white chocolate are good alternatives.
- Crisco (2 tablespoons): Helps smooth and shine the coating, making dipping easier and chocolate snappier; swap with coconut oil if you prefer a natural butter aroma.
- Miniature Reese’s Cups (18–20): Fun festive toppers with peanut buttery warmth; use mini chocolate candy or red and green M&Ms for variety.
- Christmas sprinkles: Adds cheerful texture and color; nonpareils or edible glitter are great festive finishes.
- Licorice or red vine candy (2–3 sticks, cut into ½ inch pieces): Mimic ornament hooks wonderfully; candy canes broken into pieces or pretzel sticks also work well.
Before You Begin
Before diving in, make sure you have all your ingredients prepped and ready — this recipe flows best when everything’s within arm’s reach. I recommend softening your cream cheese about 30 minutes prior; it should be pliable but not melted, allowing it to blend perfectly with crushed Oreos. Line your cookie sheets with parchment paper to catch any drips and help the chocolate set cleanly. Since no baking is involved, there’s no oven temperature to worry about — just patience for chilling!What You’ll Need
Essential tools to make Christmas Oreo Truffle Decorations Recipe easy and enjoyable — plus optional upgrades if you love efficiency.
How to Make Christmas Oreo Truffle Decorations Recipe
- Prepare your work surface. Line a large cookie sheet with parchment paper. This will be your resting place for the truffles as they chill and dry. It keeps everything tidy and makes cleanup effortless.
- Mix the truffle dough. In a bowl, combine the finely crushed Oreo cookies with softened cream cheese and vanilla extract. Use a sturdy spoon or a mixer on low speed. You’ll want a smooth, uniform dough with a slightly sticky sheen — that silky texture means they’ll hold together perfectly once chilled.
- Scoop and shape. Using a 1-inch cookie scoop, portion out the dough. Roll each ball gently between your palms until perfectly round and smooth, about 1 to 1½-inches across. This size creates a rich, single-bite explosion of flavor.
- Chill the truffles. Arrange your truffle balls on the parchment-lined cookie sheet, spacing them out so they don’t stick together. Refrigerate for 1 hour to let them firm up nicely — this step makes the dipping stage much easier and prevents messy melting.
- Start melting your first coating color. Approximately 5 to 10 minutes before the truffles finish chilling, place your first color of melting wafers into a heatproof bowl. Set up a double boiler by simmering 3-4 inches of water in a pot and positioning the bowl above without the bottom touching water. Stir the wafers gently as they begin to soften.
- Add Crisco and finish melting. When the wafers are halfway melted but still a bit chunky, stir in 1 tablespoon of Crisco. This addition creates a silky smooth chocolate with a beautiful glossy finish. Continue stirring until fully melted — the chocolate should flow like velvet.
- Dip the truffles. Using two forks or special dipping tools, gently submerge each chilled truffle ball in the melted coating. Roll it around so the entire surface is evenly covered in that shiny layer. Let excess drip off before placing back on the parchment paper.
- Decorate your truffles. While the coating is still wet, press an upside-down miniature Reese’s Cup gently on top of each dipped truffle. Then sprinkle with Christmas sprinkles for festive texture and color. Dollop a tiny bit of melted chocolate on the Reese’s Cup, then insert a small piece of licorice or red vine candy vertically to imitate an ornament hook. This small detail adds charm and holiday spirit.
- Chill the first half. Finish decorating half the truffle batch and slide the baking sheet into the refrigerator to set for at least 20 minutes. Firm truffles will make the next steps easier.
- Melt the second color wafers. While the first half chills, repeat the melting process with the other color of wafers—green or red—so everything is ready to go without waiting.
- Dip and decorate the remaining truffles. Just like you did the first half, dip the rest of the truffle balls in the second coating, then decorate with the miniature Reese’s Cups, sprinkles, and licorice candy pieces to keep the festive theme consistent.
- Final chill and set. Return all decorated truffles to the refrigerator for an additional 20 minutes. This step seals your truffles with a crisp, glossy shell and allows flavors to meld before serving or packaging for gifts.
Pro-Level Pointers
If your truffle dough feels too soft to handle, pop it back in the fridge for 15 more minutes — it should be firm but still pliable. When dipping, make sure the melted wafers are warm but not hot, or the truffles can melt and lose shape. Also, stirring in Crisco perfectly smooths the wafers, helping your coating dry with a satisfying snap.
Creative Variations for Christmas Oreo Truffle Decorations Recipe
- Peppermint Twist: Add ½ teaspoon peppermint extract to the truffle dough and garnish with crushed candy canes instead of sprinkles.
- Nutty Surprise: Mix finely chopped toasted pecans or almonds into the dough for added crunch and warmth.
- White Chocolate Wonderland: Use white chocolate melting wafers instead of red or green for a snowy effect, then add silver edible pearls.
- Festive Fruit: Top with dried cranberry bits alongside sprinkles for a tart contrast that balances sweetness.
- Spiced Holiday: Stir in ½ teaspoon cinnamon or pumpkin pie spice to the base mix for a cozy warming note.
- Mini Ornaments Display: Pipe tiny royal icing bows or messages on the Reese’s Cups for personalized edible gift tags.
Storage, Freezing & Reheating
- Storage: Keep truffles refrigerated in an airtight container for up to 1 week. This maintains the creamy texture and crisp coating perfectly.
- Freezing: For longer storage, freeze truffles in a single layer on a parchment-lined tray, then transfer to airtight containers or bags. Freeze for up to 2 months.
- Thawing: To thaw, place frozen truffles in the fridge overnight. Avoid room temperature thawing to prevent condensation softening the chocolate shell.
- Reheating: These truffles are best served cold or at room temperature. If needed, allow them to rest at room temp for 10 minutes before serving to unlock full flavor and silkiness.
Christmas Oreo Truffle Decorations Recipe FAQs
- Can I use regular cream cheese straight from the fridge?
For best results, let your cream cheese soften to room temperature — it blends more smoothly and prevents lumps in the dough. - My melted wafers are clumpy; how can I fix that?
Try stirring in a tablespoon of Crisco or coconut oil halfway through melting. Also, make sure you gently melt over simmering water rather than direct heat. - Can I skip the Reese’s cups or use a different topping?
Absolutely! They add a sweet peanut butter touch but feel free to swap with mini chocolates, nuts, or simply more sprinkles. - How long do these truffles last at room temperature?
Due to the cream cheese content, it’s safest to keep them refrigerated and enjoy within a week. - Is there a way to make these vegan or dairy-free?
Yes! Use dairy-free cream cheese and vegan chocolate or candy melts. Check labels carefully to keep all ingredients plant-based.
Why This Recipe Shines
- Flavor balance: Cozy, bright, and layered — never flat.
- Beginner tested: Clear steps with real-life timing cues.
- Customize-friendly: Works with pantry swaps and add-ins.
- Make ahead approved: Holds texture and flavor beautifully.
Ingredient Breakdown
- Oreo cookies (3 cups, finely crushed): The chocolatey backbone; substitute with any chocolate sandwich cookies or gluten-free versions for dietary needs.
- Cream cheese (8 oz, softened): Adds luscious silkiness and binds the mixture; you can try mascarpone for richer flavor or vegan cream cheese to keep it dairy-free.
- Vanilla extract (1 teaspoon): A subtle warm spice that rounds out flavors; almond or peppermint extract work beautifully for festive twists.
- Green and red melting wafers (1½ cups each): Provide vibrant, glossy coatings; candy melts or colored white chocolate are good alternatives.
- Crisco (2 tablespoons): Helps smooth and shine the coating, making dipping easier and chocolate snappier; swap with coconut oil if you prefer a natural butter aroma.
- Miniature Reese’s Cups (18–20): Fun festive toppers with peanut buttery warmth; use mini chocolate candy or red and green M&Ms for variety.
- Christmas sprinkles: Adds cheerful texture and color; nonpareils or edible glitter are great festive finishes.
- Licorice or red vine candy (2–3 sticks, cut into ½ inch pieces): Mimic ornament hooks wonderfully; candy canes broken into pieces or pretzel sticks also work well.
Before You Begin
Before diving in, make sure you have all your ingredients prepped and ready — this recipe flows best when everything’s within arm’s reach. I recommend softening your cream cheese about 30 minutes prior; it should be pliable but not melted, allowing it to blend perfectly with crushed Oreos. Line your cookie sheets with parchment paper to catch any drips and help the chocolate set cleanly. Since no baking is involved, there’s no oven temperature to worry about — just patience for chilling!What You’ll Need
Essential tools to make Christmas Oreo Truffle Decorations Recipe easy and enjoyable — plus optional upgrades if you love efficiency.
How to Make Christmas Oreo Truffle Decorations Recipe
- Prepare your work surface. Line a large cookie sheet with parchment paper. This will be your resting place for the truffles as they chill and dry. It keeps everything tidy and makes cleanup effortless.
- Mix the truffle dough. In a bowl, combine the finely crushed Oreo cookies with softened cream cheese and vanilla extract. Use a sturdy spoon or a mixer on low speed. You’ll want a smooth, uniform dough with a slightly sticky sheen — that silky texture means they’ll hold together perfectly once chilled.
- Scoop and shape. Using a 1-inch cookie scoop, portion out the dough. Roll each ball gently between your palms until perfectly round and smooth, about 1 to 1½-inches across. This size creates a rich, single-bite explosion of flavor.
- Chill the truffles. Arrange your truffle balls on the parchment-lined cookie sheet, spacing them out so they don’t stick together. Refrigerate for 1 hour to let them firm up nicely — this step makes the dipping stage much easier and prevents messy melting.
- Start melting your first coating color. Approximately 5 to 10 minutes before the truffles finish chilling, place your first color of melting wafers into a heatproof bowl. Set up a double boiler by simmering 3-4 inches of water in a pot and positioning the bowl above without the bottom touching water. Stir the wafers gently as they begin to soften.
- Add Crisco and finish melting. When the wafers are halfway melted but still a bit chunky, stir in 1 tablespoon of Crisco. This addition creates a silky smooth chocolate with a beautiful glossy finish. Continue stirring until fully melted — the chocolate should flow like velvet.
- Dip the truffles. Using two forks or special dipping tools, gently submerge each chilled truffle ball in the melted coating. Roll it around so the entire surface is evenly covered in that shiny layer. Let excess drip off before placing back on the parchment paper.
- Decorate your truffles. While the coating is still wet, press an upside-down miniature Reese’s Cup gently on top of each dipped truffle. Then sprinkle with Christmas sprinkles for festive texture and color. Dollop a tiny bit of melted chocolate on the Reese’s Cup, then insert a small piece of licorice or red vine candy vertically to imitate an ornament hook. This small detail adds charm and holiday spirit.
- Chill the first half. Finish decorating half the truffle batch and slide the baking sheet into the refrigerator to set for at least 20 minutes. Firm truffles will make the next steps easier.
- Melt the second color wafers. While the first half chills, repeat the melting process with the other color of wafers—green or red—so everything is ready to go without waiting.
- Dip and decorate the remaining truffles. Just like you did the first half, dip the rest of the truffle balls in the second coating, then decorate with the miniature Reese’s Cups, sprinkles, and licorice candy pieces to keep the festive theme consistent.
- Final chill and set. Return all decorated truffles to the refrigerator for an additional 20 minutes. This step seals your truffles with a crisp, glossy shell and allows flavors to meld before serving or packaging for gifts.
Pro-Level Pointers
If your truffle dough feels too soft to handle, pop it back in the fridge for 15 more minutes — it should be firm but still pliable. When dipping, make sure the melted wafers are warm but not hot, or the truffles can melt and lose shape. Also, stirring in Crisco perfectly smooths the wafers, helping your coating dry with a satisfying snap.
Creative Variations for Christmas Oreo Truffle Decorations Recipe
- Peppermint Twist: Add ½ teaspoon peppermint extract to the truffle dough and garnish with crushed candy canes instead of sprinkles.
- Nutty Surprise: Mix finely chopped toasted pecans or almonds into the dough for added crunch and warmth.
- White Chocolate Wonderland: Use white chocolate melting wafers instead of red or green for a snowy effect, then add silver edible pearls.
- Festive Fruit: Top with dried cranberry bits alongside sprinkles for a tart contrast that balances sweetness.
- Spiced Holiday: Stir in ½ teaspoon cinnamon or pumpkin pie spice to the base mix for a cozy warming note.
- Mini Ornaments Display: Pipe tiny royal icing bows or messages on the Reese’s Cups for personalized edible gift tags.
Storage, Freezing & Reheating
- Storage: Keep truffles refrigerated in an airtight container for up to 1 week. This maintains the creamy texture and crisp coating perfectly.
- Freezing: For longer storage, freeze truffles in a single layer on a parchment-lined tray, then transfer to airtight containers or bags. Freeze for up to 2 months.
- Thawing: To thaw, place frozen truffles in the fridge overnight. Avoid room temperature thawing to prevent condensation softening the chocolate shell.
- Reheating: These truffles are best served cold or at room temperature. If needed, allow them to rest at room temp for 10 minutes before serving to unlock full flavor and silkiness.
Christmas Oreo Truffle Decorations Recipe FAQs
- Can I use regular cream cheese straight from the fridge?
For best results, let your cream cheese soften to room temperature — it blends more smoothly and prevents lumps in the dough. - My melted wafers are clumpy; how can I fix that?
Try stirring in a tablespoon of Crisco or coconut oil halfway through melting. Also, make sure you gently melt over simmering water rather than direct heat. - Can I skip the Reese’s cups or use a different topping?
Absolutely! They add a sweet peanut butter touch but feel free to swap with mini chocolates, nuts, or simply more sprinkles. - How long do these truffles last at room temperature?
Due to the cream cheese content, it’s safest to keep them refrigerated and enjoy within a week. - Is there a way to make these vegan or dairy-free?
Yes! Use dairy-free cream cheese and vegan chocolate or candy melts. Check labels carefully to keep all ingredients plant-based.
The Heart of Christmas Oreo Truffle Decorations Recipe
There’s something truly special about crafting Christmas treats that feel as festive as they taste. The Christmas Oreo Truffle Decorations Recipe brings together creamy, chocolatey bliss with bright red and green touches that instantly spark joy. I love how it’s such a cozy, hands-on activity — like decorating your own little edible ornaments straight from the heart of your kitchen. As you roll the silky, slightly sticky Oreo and cream cheese mixture into smooth balls, you’ll notice how the texture hints at the luscious bite to come. Then dipping them in glossy, colorful melting wafers feels a bit like magic – watching the chocolate shimmer into a crisp-edged coat. This recipe really lets you blend delicious flavors with a sprinkle of holiday cheer, creating truffles that are perfect for gift-giving or gathering around the table with friends and family. I’m excited to share this step-by-step guide with you, so you’ll feel confident making these charming truffles in your own kitchen. Before we get started, here’s why this Christmas Oreo Truffle Decorations Recipe deserves a spot on your holiday must-make list.Why This Recipe Shines
- Flavor balance: Cozy, bright, and layered — never flat.
- Beginner tested: Clear steps with real-life timing cues.
- Customize-friendly: Works with pantry swaps and add-ins.
- Make ahead approved: Holds texture and flavor beautifully.
Ingredient Breakdown
- Oreo cookies (3 cups, finely crushed): The chocolatey backbone; substitute with any chocolate sandwich cookies or gluten-free versions for dietary needs.
- Cream cheese (8 oz, softened): Adds luscious silkiness and binds the mixture; you can try mascarpone for richer flavor or vegan cream cheese to keep it dairy-free.
- Vanilla extract (1 teaspoon): A subtle warm spice that rounds out flavors; almond or peppermint extract work beautifully for festive twists.
- Green and red melting wafers (1½ cups each): Provide vibrant, glossy coatings; candy melts or colored white chocolate are good alternatives.
- Crisco (2 tablespoons): Helps smooth and shine the coating, making dipping easier and chocolate snappier; swap with coconut oil if you prefer a natural butter aroma.
- Miniature Reese’s Cups (18–20): Fun festive toppers with peanut buttery warmth; use mini chocolate candy or red and green M&Ms for variety.
- Christmas sprinkles: Adds cheerful texture and color; nonpareils or edible glitter are great festive finishes.
- Licorice or red vine candy (2–3 sticks, cut into ½ inch pieces): Mimic ornament hooks wonderfully; candy canes broken into pieces or pretzel sticks also work well.
Before You Begin
Before diving in, make sure you have all your ingredients prepped and ready — this recipe flows best when everything’s within arm’s reach. I recommend softening your cream cheese about 30 minutes prior; it should be pliable but not melted, allowing it to blend perfectly with crushed Oreos. Line your cookie sheets with parchment paper to catch any drips and help the chocolate set cleanly. Since no baking is involved, there’s no oven temperature to worry about — just patience for chilling!What You’ll Need
Essential tools to make Christmas Oreo Truffle Decorations Recipe easy and enjoyable — plus optional upgrades if you love efficiency.
How to Make Christmas Oreo Truffle Decorations Recipe
- Prepare your work surface. Line a large cookie sheet with parchment paper. This will be your resting place for the truffles as they chill and dry. It keeps everything tidy and makes cleanup effortless.
- Mix the truffle dough. In a bowl, combine the finely crushed Oreo cookies with softened cream cheese and vanilla extract. Use a sturdy spoon or a mixer on low speed. You’ll want a smooth, uniform dough with a slightly sticky sheen — that silky texture means they’ll hold together perfectly once chilled.
- Scoop and shape. Using a 1-inch cookie scoop, portion out the dough. Roll each ball gently between your palms until perfectly round and smooth, about 1 to 1½-inches across. This size creates a rich, single-bite explosion of flavor.
- Chill the truffles. Arrange your truffle balls on the parchment-lined cookie sheet, spacing them out so they don’t stick together. Refrigerate for 1 hour to let them firm up nicely — this step makes the dipping stage much easier and prevents messy melting.
- Start melting your first coating color. Approximately 5 to 10 minutes before the truffles finish chilling, place your first color of melting wafers into a heatproof bowl. Set up a double boiler by simmering 3-4 inches of water in a pot and positioning the bowl above without the bottom touching water. Stir the wafers gently as they begin to soften.
- Add Crisco and finish melting. When the wafers are halfway melted but still a bit chunky, stir in 1 tablespoon of Crisco. This addition creates a silky smooth chocolate with a beautiful glossy finish. Continue stirring until fully melted — the chocolate should flow like velvet.
- Dip the truffles. Using two forks or special dipping tools, gently submerge each chilled truffle ball in the melted coating. Roll it around so the entire surface is evenly covered in that shiny layer. Let excess drip off before placing back on the parchment paper.
- Decorate your truffles. While the coating is still wet, press an upside-down miniature Reese’s Cup gently on top of each dipped truffle. Then sprinkle with Christmas sprinkles for festive texture and color. Dollop a tiny bit of melted chocolate on the Reese’s Cup, then insert a small piece of licorice or red vine candy vertically to imitate an ornament hook. This small detail adds charm and holiday spirit.
- Chill the first half. Finish decorating half the truffle batch and slide the baking sheet into the refrigerator to set for at least 20 minutes. Firm truffles will make the next steps easier.
- Melt the second color wafers. While the first half chills, repeat the melting process with the other color of wafers—green or red—so everything is ready to go without waiting.
- Dip and decorate the remaining truffles. Just like you did the first half, dip the rest of the truffle balls in the second coating, then decorate with the miniature Reese’s Cups, sprinkles, and licorice candy pieces to keep the festive theme consistent.
- Final chill and set. Return all decorated truffles to the refrigerator for an additional 20 minutes. This step seals your truffles with a crisp, glossy shell and allows flavors to meld before serving or packaging for gifts.
Pro-Level Pointers
If your truffle dough feels too soft to handle, pop it back in the fridge for 15 more minutes — it should be firm but still pliable. When dipping, make sure the melted wafers are warm but not hot, or the truffles can melt and lose shape. Also, stirring in Crisco perfectly smooths the wafers, helping your coating dry with a satisfying snap.
Creative Variations for Christmas Oreo Truffle Decorations Recipe
- Peppermint Twist: Add ½ teaspoon peppermint extract to the truffle dough and garnish with crushed candy canes instead of sprinkles.
- Nutty Surprise: Mix finely chopped toasted pecans or almonds into the dough for added crunch and warmth.
- White Chocolate Wonderland: Use white chocolate melting wafers instead of red or green for a snowy effect, then add silver edible pearls.
- Festive Fruit: Top with dried cranberry bits alongside sprinkles for a tart contrast that balances sweetness.
- Spiced Holiday: Stir in ½ teaspoon cinnamon or pumpkin pie spice to the base mix for a cozy warming note.
- Mini Ornaments Display: Pipe tiny royal icing bows or messages on the Reese’s Cups for personalized edible gift tags.
Storage, Freezing & Reheating
- Storage: Keep truffles refrigerated in an airtight container for up to 1 week. This maintains the creamy texture and crisp coating perfectly.
- Freezing: For longer storage, freeze truffles in a single layer on a parchment-lined tray, then transfer to airtight containers or bags. Freeze for up to 2 months.
- Thawing: To thaw, place frozen truffles in the fridge overnight. Avoid room temperature thawing to prevent condensation softening the chocolate shell.
- Reheating: These truffles are best served cold or at room temperature. If needed, allow them to rest at room temp for 10 minutes before serving to unlock full flavor and silkiness.
Christmas Oreo Truffle Decorations Recipe FAQs
- Can I use regular cream cheese straight from the fridge?
For best results, let your cream cheese soften to room temperature — it blends more smoothly and prevents lumps in the dough. - My melted wafers are clumpy; how can I fix that?
Try stirring in a tablespoon of Crisco or coconut oil halfway through melting. Also, make sure you gently melt over simmering water rather than direct heat. - Can I skip the Reese’s cups or use a different topping?
Absolutely! They add a sweet peanut butter touch but feel free to swap with mini chocolates, nuts, or simply more sprinkles. - How long do these truffles last at room temperature?
Due to the cream cheese content, it’s safest to keep them refrigerated and enjoy within a week. - Is there a way to make these vegan or dairy-free?
Yes! Use dairy-free cream cheese and vegan chocolate or candy melts. Check labels carefully to keep all ingredients plant-based.